You may have used an electronic device with a small Liquid Crystal Display (LCD) which has a textual hierarchical menu system for setting device configuration parameters. If you have tried writing menu code for your Arduino projects, you will recognise the challenge in developing a generic menu system for an open prototyping platform. This is because there are many input and display devices available, and a generic menu system must be independent of whichever input and display devices you wish to use. With our Arduino menu library, this independence is achieved by having the menu manager code use callback methods for handling user input and rendering the menu display.
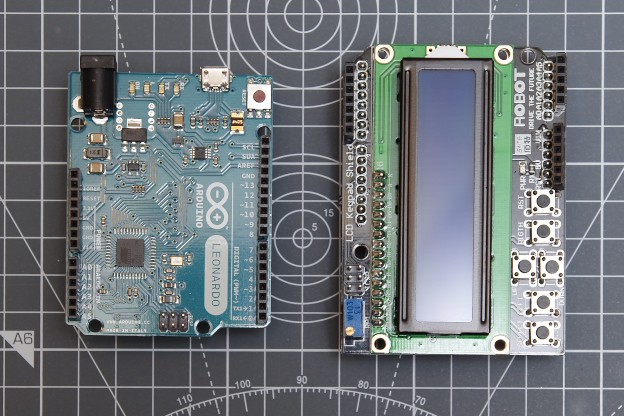
To keep things simple, all coding examples have been targeted to work with an R3 Arduino Uno/Leonardo/Mega2560, and an LCD keypad shield similar to one illustrated above. There are numerous manufacturers of LCD keypad shields that have the same or similar pin connections, and you must ensure that the sample menu code uses the pin connections that are right for your shield. If the keypad buttons of your shield give different analog readings, you’ll need to make changes to file LcdKeypad.h. Bear in mind that the analog readings are not always consistent, which can lead to the occasional misreporting of a button press. Once you become familiar with the menu library, adapting it for use with other input and display devices should be straight-forward.
With numerous menu libraries readily available, why use this Arduino menu library? We think it is easier to use thanks to our online code generator, and has better memory efficiency with its use of PROGMEM. Watch the short video clip below and see for yourself.
Follow a Few Simple Steps to Build a LCD Menu. Whilst every effort is made to ensure downloadable files are not infected with malware, it is recommended that your computing environment is sufficiently protected from malicious software. You agree to download any and all files at your own risk.
Step 1 – Download LCD Menu Sample Project
Download the following Arduino sample project for testing out your menus. You’ll need to find and install the TimerOne library for the code to compile.
Step 2 – Use Menu Builder
Our free online menu builder allows you to paste in a simple Xml representation of your menu, from which the Arduino menu source code is generated automatically. Use the sample Xml included in the project you just downloaded to get started.
- Online LCD Menu Builder
- Alternatively, download the command line menu builder
Step 3 – Build Arduino Project
Copy the generated code and paste in to MenuData.h file of your Arduino project, overwriting existing content. Build and upload your Arduino project.
Step 4 – Test Your Menu
After successfully uploading your Arduino project, test out your menu. Now that you have a menu in place, you can work on the main logic of your application. If you need to rework your menu in the future, the MenuData.h file has a copy of the xml that was used to generate it, which you can copy and paste in to the online menu builder.
Using Menus in Your Own Code
You can use the downloaded sample Arduino project as a starting point for your own coding requirements. You will need to write your own code in the body of method processMenuCommand(byte cmdId) to determine what must be done when a menu item is selected. The cmdId parameter is the Id you associate with a menu item in your menu Xml file. Callback method getNavAction() handles user input, and callback method refreshMenuDisplay(byte refreshMode) renders the menu. To work with other input and display devices you’ll need to re-write the code in these methods. Some LCD keypad shields are not suited for hardware PWM backlight control, and as such the coding example uses a soft PWM alternative.
LCD Countdown Timer with Menu System
The source code for an Arduino countdown timer with multiple profiles can be downloaded from the link below:
The Select button on the LCD shield starts/stops a timer, with a long press resetting the timer. A long press of Up enters the menu. Up/Down/Right buttons are for navigating the menu, and Select for choosing a menu item. When an item is selected, Up/Down are used for changing values. When the Reset menu item is displayed, a long press of Select loads default configuration values. Digital pin 2 is used for activating a beeper for the alarm. Examining the source should give you good insight for using the menu system in your own projects. If you find this Arduino menu library guide useful, please share it.
HI Kashif I found this
You must install Timer1
https://code.google.com/archive/p/arduino-timerone/downloads
Kashif Thanks for all the great job you have done with the menu library.
KUDOS
// Patrik
Thanks Patrik for pointing out the Timer1 library. I’ll update the page accordingly.
like Kashif Baig said! Thanks for pointing out the Timer1 library.
you’re awesome!!
thanks brther………………
Hello do you you have the simple code and schematic for push buttons , and an Arduino menu displayed on a lcd?
Hi,
Love your menu templates. Is there a reasonably simple way of altering Template 4 to follow:
Right button: descends down through menu tree which it does currently.
Left button: ascends back through menu tree.
Select button: performs functions.
This would be the same as a Joystick with X/Y axis (operating like L and R buttons), and a stick push down (operating as the select button).
these changes would really suit a home project I am working on.
Regards,
Cam H.
Hi Cameron. In the main project file there is a function getNavAction(). There is a line that is commented out regarding left button press. If you uncomment it, the left button will ascend up the tree. You should be able to further change the logic in this function to do as you require.
I hope that helps.
OK. Thanks. I will have to do some more stuff to try and change the function. I need the BACK button to do what the SELECT bottom does in moving up and down the menu.
Im a bit out of my depth here. It was worth a try.
Persistence paid off. I had the wrong setting for the button values.
Cam H.
Glad you got it working!
Kashif, thanks for providing an awesome menu framework that is easy to use and set up.
I am currently building a project on a Teensy 3.5 and the menu is working for all of the functions implemented so far but now I am adding a frequency counter to it and the TimerOne lib conflicts with the FreqMeasure lib for the teensy with the following message:
/home/john/Downloads/arduino-1.8.1/hardware/teensy/avr/libraries/FreqMeasure/util/FreqMeasureCapture.h:126: multiple definition of `ftm1_isr’
/tmp/arduino_build_880203/libraries/TimerOne/TimerOne.cpp.o:/home/john/Downloads/arduino-1.8.1/hardware/teensy/avr/libraries/TimerOne/TimerOne.cpp:34: first defined here
/home/john/Downloads/arduino-1.8.1/hardware/tools/arm/bin/../lib/gcc/arm-none-eabi/4.8.4/../../../../arm-none-eabi/bin/ld: Disabling relaxation: it will not work with multiple definitions
collect2: error: ld returned 1 exit status
Commenting out the TimerOne include fails as there are calls to things that don’t exist in the FreqMeasure lib:
PFT_OS:97: error: ‘Timer1’ was not declared in this scope
Timer1.initialize();
^
&&
‘Timer1’ was not declared in this scope
What in TimerOne is necessary as I would like to remove it if possible?
Hi John
The TimerOne library is only used for display brightness, as some LCD shields have a problem with hardware PWM for brightness control. It should be straight forward to remove the dependency on TimerOne for brightness control. I hope that helps.
Kashif,
I changed to using TimerThree and it now compiles. Still need to test it on the unit but I believe this will work.
Ok, thanks for the response.
Awesome, I removed all of the TimerOne deps and it’s working without any hacks. Thanks again.
Kashif, I am having an issue where the menu may jump intermittently to the previously selected item or all the way back to root when a button is pressed. This can happen with a short press, a hold (does not jump while held but may upon release), or a firm press (this actually works best but it still may jump). The menu does not jump while no buttons are pressed.
Using a analogRead sketch I’ve found the buttons values are: 1, 223, 528, 782, 929, and 1023 for none.
In the LcdKeypad.h I have set the buttons to 10, 235, 538, 792, and 939.
Hi John. In LcdKeypad.cpp, find the method buttonHandlerCycle(). Try performing a further analogRead(BUTTON_PIN) before assigning to analogReading variable, like so:
analogRead (BUTTON_PIN);int analogReading = analogRead (BUTTON_PIN);
That worked, but I also had to set the sample time to 100 (probably does not need to be that high) in order to tighten it up a bit more.
The (hopefully last) thing I am trying to get my head around is to clear rows 1-3 when moving up or down in the menu tree so the last displayed lcd.print() data is not displayed until another function is selected. I am using a 20×4 lcd, so only the first line is cleared. I’m eyeballing “width + 1” but am too tired to try any more tonight.
Hi. Code looks great but is it possible to modify to use a rotary encoder ?
I need a menu to run on a 20×4 LCD on a reprap discount smart controller that attaces to a ramps board with these pins :
#define LCD_PINS_RS 16 // LCD control
#define LCD_PINS_ENABLE 17 // LCD enable pin
#define LCD_PINS_D4 23 // LCD signal pin
#define LCD_PINS_D5 25 // LCD signal pin
#define LCD_PINS_D6 27 // LCD signal pin
#define LCD_PINS_D7 29 // LCD signal pin
#define BTN_EN1 37 // Encoder left direction
#define BTN_EN2 35 // Encoder right direction
#define BTN_ENC 31 // Encoder Click
Regards
Dave
Hi Dave
The best place to start would be the LcdMenuTemplate.ino source code file. There is a method getNavAction() where you can map rotary encoder input values to menu navigation commands. Once your code changes work, you’ll need to modify the refreshMenuDisplay() method to output to your 20×4 LCD. There is some code commented out there which when uncommented will output menus to the serial monitor. When you’ve understood how that works, you should be in a position to making the necessary changes to work with your LCD. Hope that helps.
Kashif
I see several users asking about rotary encoder. Me too! 😉 And in my case, I’m not using an LCD as display, but rather a quad LED segment display: https://learn.adafruit.com/14-segment-alpha-numeric-led-featherwing/usage
It would seem that it could be useful to make your library even more general purpose to allow for other types of inputs as well as other types of outputs (display type X or serial port).
Hi Kashif
I was wondering how easy it would be to make this program work on a 20X4 display and have 4 menus to select from on one display
Thank You
Ben
Hi Ben. It is possible (but not easy) to make this work with 20×4 display. What I suggest you do (if you haven’t already) is to uncomment the code in refreshMenuDisplay() in the main file of the LcdMenuTemplate. This will output the menus to the serial monitor, and should help you understand how to display multiple menu items. You can try outputting to the serial monitor values from Menu1.getCurrentItemIndex(). I hope that helps.
How i connect “relay” this divice? Becouse i need to time off switch using relay.
But i dont no where is the output pin i connect it.
I am amateur to Arduino
please help me to build it.
i am sorry, my english is not well.
Could You give please code how change this for encoder and LCD 16×2
Thanks
Just love the work you have done with this menu Kashif. Still trying to figure it out though. I have 4 menu groups with 3 sub-menus in each and one menu option at the very end that has no sub-menus at all.
Is there a limit to the number of main menu items? If so can it be changed and from where? Every time I paste my xml into the code generator on your website it errs with “There is an error in XML document (31, 7).” This line and col are at my final tag in the xml file which is followed by the last <Item Id= statement in the menu which will put the software into run mode after the initial system configuration via the menu.
Any help you could provide would be greatly appreciated.
Thanks in advance
Jake
Thanks Jake. I don’t recall a limit in the number of items, so that shouldn’t be a problem. You could try pasting your xml in an online xml validator to see if you get more specific details. If not, share a link to your xml and I’ll see if I can spot the problem.
Kashif, found the problem. Thanks for the quick reply. All working good at least in these first steps of using your menu system. If I have further questions(which I’m sure I will) I’ll ask. Somewhat of a beginner with this tuff but have quit a bit of programming in VB 6 used in SCADA Systems of which never really gets down to this level of the hardware. So I’m sure I’ll be asking more questions.
Thanks again for the quick reply.
Oh and don’t worry none of this is being used to control any machinery. I’m retired and love dabbling around this stuff. Just wish I would have got into it more in depth while I was still working. More like a hobby to occupy my time when I can’t be on the golf course.
Jake
Tks for your amazing work.
I followed your steps to copy and create the Menu
Error when compiling in the Arduino IDE
Archiving built core (caching) in: C:\Users\Frank\AppData\Local\Temp\arduino_cache_352800\core\core_arduino_avr_uno_576b18f4a57fe4e153f99a344cacb86b.a
C:\Users\Frank\AppData\Local\Temp\ccIz3ZIc.ltrans0.ltrans.o: In function `main’:
D:\Program Files (x86)\arduino-1.8.2\hardware\arduino\avr\cores\arduino/main.cpp:43: undefined reference to `setup’
D:\Program Files (x86)\arduino-1.8.2\hardware\arduino\avr\cores\arduino/main.cpp:46: undefined reference to `loop’
collect2.exe: error: ld returned 1 exit status
Hi Frank, do you get the same error when compiling the LCD timer sketch that uses menus?
Hi Kashif, the sytem that I’m working with has three main menus and eight sub-menus each. I need to modify the code such that when a submenu is selected a HIGH needs to be written to three different LEDs indicating which main menu is seleted. I am have problems doing this and any help would be greatly appreciated.
Hi Kashif, I just got my Arduino and an LCD keypad shield very similar to yours. I uploaded your timer code and found that the select key was not working properly. I determined the addresses of each key using the analogRead() and remapped the values in LcdKeypad.h slightly to make it work, then I was able to navigate the menus and kick off the timer. However, I noticed that my setup was not beeping on alarm nor during each button press. Is this something that should work with the arduino uno R3 and LCD keypad shield out of the box or do I need some extra hardware to have an alarm/buzzer output noise?
Hi Greg. I connected my beeper directly with the Arduino, although you may want to use a transistor. Are you able to get your beeper sounding by applying power directly?
Hi Kashif,
Sir,
I tried your sketch which mentioned in your PDF about the countdown timer. But it wasn’t work properly. I used Arduino UNO R3 (Compatible one) and 1.8.4 IDE software in windows 8.
Sketch was upload correctly with no errors. but not counting down.it acting like crazy with several several numbers on the display..purely out of control..kindly help me sir…
Hi Kashif,
I´m a beginner in arduino programming . I need it for a CNC School Project…
My problem is, that i have a Adafruit LCD RGB with I2c communication!
How/where can i change the Code to use that Menue on my I2c Display?
Nice greets
Patrick
i need arduino lcd menu simple
help me please
Excellent project.
I love that you have the online code generator to translate XML to the menu header file, and that you are making extensive use of PROGMEM to store the menu tree and text strings.
One thing I might add to the MenuItem structure is a function pointer, so that, if non-NULL, the menu system would automatically call that function when the menu item is selected (instead of using the switch/case code).
Also, I am not sure if you enable use of a “back” button to navigate from a menu item to its parent, but, in my opinion, I think that doing so might be slightly better than having a separate “Back” menu item in each menu or sub-menu list.
In any case, very well done! Thank you for making this available. I hope to use this with an IR remote for a POV clock project. (To enable setting time and date, and to enter dated text messages – the latter to be saved in EEPROM memory.) Of course, the POV clock display would be used instead of LCD, and the IR Remote input instead of buttons.
Thanks again, and very best regards,
Ed.
Hi Ed, thanks for the feedback. I like the idea of the function pointer. I’m guessing the way that would work is the function name would be provided in the Xml. If absent, the pointer defaults to null.
Regarding the back menu item, it should be possible to hide it in code, i.e. just don’t display if the Id is 0. I originally had a rotary encoder in mind for menu navigation. I guess this too could be configurable from the xml.
I hope that helps.
Kashif
Hey Kashif!
I want to thank you for your hard work. I have attempted to use many available LCD menu templates and yours by far works with the least amount of issues.
I would also like to thank you for replying to questions here, you are helping out if you have time.
This code is above my skill level and grasp in many aspects, and i hope to learn enough to use it well
I have written a case statement for the command id, and can get it to perform the code i have written, how do you beck out of the tree and refresh the screen?
Currently the screen goes blank after selecting and i must push another button to force a refresh
I would like to simulate a button press in software and i cannot find how to do this either
Your help would be fantastic, but even better would be comments throughout your code 😉
Thanks
Brad
Hi Brad. I haven’t tested this, but assuming you want to back out of the menu from method processMenuCommand(), I think you’ll need to set your own global variable/flag indicating so, then return true from within the aforementioned method. Then, within the main loop() method, under case APP_PROCESS_MENU_CMD and within the if (processingComplete) block, perform a test against your global variable. If the test is positive, you’ll need to Menu1.reset() and set appMode = APP_NORMAL_MODE.
In any case, the key is to reset the menu, and return to normal application flow. Let me know how you get on.
Kashif
I try to succeed . thanks u , but i want it made repeat ? can modify timer 1 keep timer 2 hold timer 3 ?
Thanks again, and very best regards,
yanbudi
Hello,
Anybody can help me to modify the sketch to work with a 4×4 keypad, I connected the key pad to digital pins, I will trying the 2 last week but I can’t
Thanks and Regards
I was able to load and run the examples, but when I customize an XML for my menu items, I get an error from the LCD Menu Builder webpage.
The XML I’m trying to parse is as follows:
and the output gives: “Object reference not set to an instance of an object.”
I’ve stared at this for quite a while and don’t see the problem in XML. It parses ok with a different editor.
Any ideas?
Thanks in advance…
It would not display XML when I pasted it in the comment, so I put it on google drive and created a link to it.
https://drive.google.com/file/d/1K-vUzWR89H28dGUzggUojmhfdFVgAKVs/view?usp=sharing
Please let me know if my problem is the XML or the menu builder page.
Thanks.
Hi David
The problem is with the Timers xml tag. It doesn’t have a name attribute. Try something like:
<Item Id="Timers" Name="some name here">I hope that helps.
Hi please how can I add Analoginput to work with a different digitaloutput, and been able to set The output delay time
And also to separate the timer output
sir, i got problems’
1.how to change A0 analog values becos my lcd keypad some buttons not respond specially back(maybe reading differ from yours)
2′ iam beginner so i need menu following structure,
press select button->got to 7 top menus and back(home)(go up and down)->3-5 submenus each->2-3 sebmenus for each submenu
I really appreciate the gentleman for the work he has done here. THANK YOU!!!
I am new to programming and stumbling quite often. I am asking for help adding a stopwatch to this project for seconds, minutes & hours for a project I am trying to assemble.
If any can and would be willing to help, please respond soon.
Thank you,
Perry
Hi Kashif,
Great work on this one, i only just wanted to ask why the left button acts like a down button it keeps happening to me and i can’t find the reason i checked all the files and i can’t even find left button used somewhere, will appreciate your help, since i wanted to make left and right buttons brightness adjustment. Thanks in advance! 🙂
Regards,
Peter
Found the problem the #define BUTTON_DOWN_ANALOG_VALUE 485 is higher that it should be, it should be #define BUTTON_DOWN_ANALOG_VALUE 450.
LcdMenuTemplate
I’m not good at programming 🙂
Do you have any example of a menu with specific values set. E.g. Temperature setting, how to set the brightness?
Where do you have to write this code?
Where to write the code that will display various parameters on the display after exiting the menu?
Thank you for your help and great work 😉
Hello Joel. You will have to use our online menu generator to include the menu options you require. There are two code examples included in the source code download, one that just displays the menus, and the countdown timer showing how to perform and use configuration options. If you would like someone develop code for you, please contact us using the ‘Contact Us’ page.
Hi, Kashif
Congratulations on your truly excellent project, I am not approaching programming now. I was wondering if it was possible to make a sequence time1 + time2 + time3 and to be able to set x times we want to repeat it (up to 100 times) and each time should drive a relay.
Thanks and again Congratulations
Hi Roberto. What you’re asking is possible but will be a bit difficult if you wanted to continue using the menu generator. Without the menu generator it is a little simpler. Our mutli function shield example might be a better starting place for this type of timer.
Thank you
Kashif I’m not good at programming and I don’t know if I will succeed but I try
See how it works out. If you don’t succeed and would like someone to develop a project for you, please contact us using the ‘Contact Us’ page. Thanks.
congratulations because the idea of the .xml automatic menu generator is really high level and the example program LcdCountDownTimer is really well done
Thanks Luciano, I hope you found it useful.
yes I work with visual studio 2019 and visual micro, and so the analysis of your code is easy for me
Great project, I changed the #define ALARM_PIN 2 on the LcdCountDownTimer sketch
to #define ALARM_PIN 12 // use MISO pin and GND pin on ICSP header for Buzzer
this allows connecting the shield that doesn’t have any other headers soldered on.
Thank you for this beautiful work! I tried many codes, but this one seems to be the best!
For now, I figured out how to add menus, submenus, go into a menu and exit from it. But, this code is by far beyond my skills and I easy get lost into it… I would like to know if you can help me with the following questions:
1. How can I add a Menu -> Select it -> Display text? Something like and when you select it, just display some text row by row.
2. Where can I define if in that menu something is happening> Something like I go in Menu1 which has SubMenu1, SubMenu2, SubMenu3 and when I select SubMenu1 something happens (display text, save a variable, set a reference parameter, start a loop, anything).
Thank you very much and again, great job!
Hello Iulian
Perhaps start by reviewing the basic LcdMenuTemplate project, and find the refreshMenuDisplay() method in the project file. In there you will find some commented code, which you can uncomment to display the menu items to the serial console. You can also use this method to display something to the LCD.
Review the same method in the countdown timer project, and find line 535. Here you will see how the timer configuration settings are displayed on the LCD.
I hope that helps
Kashif
Well, the menu for the countdown timer works okay, but the timer itself does not work when I press the select button. It never counts down and stays at the set time. I go to timer 1 and press select and it does not count down. Any idea what is wrong?
HI. It’s quite possible the select button is not being caught by the button logic. You’re going to need to find out what the actual analog value of the select button is by writing a sketch to analog read pin 0. Then you’ll need to modify LcdKeypad.h to take that in to account.
Thanks so much for your menu library :D. it’s so much more simple to program than others I have found. will you release as a library into arduino’s library repo?
Hello, I’m glad you find the library and generator useful. I haven’t yet considered releasing the library to the repo as it relies on my online menu generator. It is actually possible to develop a completely different library that works with the generator, and so the generator is the key the key thing.
ah I see. I got a question though. can you explain how the code in loop() works? I am trying to move it into a FreeRTOS task. I want it to trigger on keypress.
It’s probably best to start with the LcdMenuTemplate project. The code in loop() is essentially a finite state machine that manages the different states of the running program, i.e. normal mode, menu navigation mode and menu invocation mode, and menu exit. The code in getNavAction() translates button presses in to menu navigation commands. It’s possible to use a rotary encoder and translate to menu navigation, instead of key presses.
I hope that helps.
I see, thanks.
also, I saw this inside lcdkeypad.cpp at line 232:
// If calling from ISR, comment out call in getButton() method.
void buttonHandlerCycle()
so If I were to use interrupts. do I call this function inside my interrupt function?
I don’t remember testing this method. It’s probably not a good idea in this case as analogRead() is used for determining the button pressed. You could increase the frequency at which ADC is performed (making analog reads faster), but you may get a different set of values for the key presses, which will need to be factored in the code.
I got it to work. using task notifications
BUT. for some reason. it doesn’t interrupt when it I press ‘select’ and ‘left’ on the keypad shield. for interrupts to work. I connected a bridging wire from pin A0 to Pin18 (arduino mega). it responds and works with all buttons except for ‘select’ and ‘left’
here’s the the code in lcdmenutemplate.ino. code everywhere else is unchanged.
https://pastebin.com/dpgVYGRa
I hadn’t envisaged using buttonHandlerCycle() in the manner you describe. The intention was to call it using a timer based interrupt on a regular interval, similar to how it has been done with the multi function shield library.
If you haven’t done already, you’ll need to inspect the values you’re getting from analogRead(), and re-work these values back into the source code.
Okay I have fixed it. All I did was remove the interrupt logic. menu works fine inside its own FreeRTOS Task now. you can re-check the pastebin link for changes
@kashif Baig
Hello again
how do I call the back() function from a menu element?
like if i watnmed to choose a menu element that would call something to run and right after it’s done, would go back ?
I don’t think I’ve considered this scenario. Menu command (element) processing and navigation are managed separately by processMenuCommand() and getNavAction(), respectively.
Refering to the original code, you would need to put some extra code in getNavAction() to know when to return MENU_BACK. Perhaps check (then clear) a flag you have set when your element routine has completed running.
AhI see. but what if I wanted to add something with the same ID inside multiple submenus?
like
“foo > bar”
“goo > bar | tar”
“loo > bar | rar”
“bar” here is the repeated item. your menu data builder tells me I cannot have multiple items with the same ID.
Yes, IDs must be unique. You could write your own code to remap them to values suitable for your own requirements.
Hello. Im a newbie as was trying out your menu system using Arduino Uno and a LCD keypad shield. I cannot get the SELECT key to select on the LCD Timer. I ran another simple test program to validate it wasnt my shield and this worked just fine. Is there something obvious im missing here please. I did check out LCDkeypad.h and the values were similar in the definitions. The value returned by SELECT is 640. I updated this in LCDkeypad.h but it had no effect. Thanks in advance. Jamie
TEST PROGRAM
#include “LiquidCrystal.h”
LiquidCrystal lcd( 8, 9, 4, 5, 6, 7);
void setup() {
lcd.begin(16, 2);
lcd.setCursor(0,0);
lcd.print(” Test Prog “);
lcd.setCursor(0,1);
lcd.print(“Press Key:”);
}
void loop() {
int x;
x = analogRead (0);
lcd.setCursor(10,1);
if (x < 60) {
lcd.print ("Right ");
}
else if (x < 200) {
lcd.print ("Up ");
}
else if (x < 400){
lcd.print ("Down ");
}
else if (x < 600){
lcd.print ("Left ");
}
else if (x < 800){
lcd.print ("Select");
}
}
Hello Jamie. Perhaps upload your changes somewhere, and when I get a chance I could try it out.
Hi I’m making your menu, may i ask if I use my own button where should i define them. thankss
I’m trying to run this on a Teensy 4.0. I first ran into trouble with the timer library and simply removed all references- I’ll deal with the brightness with HW pwm.
However, I’m getting issues with the “strcpy_p command, compiling for Teensy 4:
#define strcpy_P(dest, src) strcpy((dest), (src))
“error: ‘strcpy’ was not declared in this scope”
I understand that Teensy deals with programspace differently. But I’m not sure how to change the instances of strcpy_p to deal with the error.
Hi Stefan, in your menu XML file, you can firstly set the attribute AvrProgMem=”false” in the Config tag. This will remove the PROGMEM from the resulting menu code. In the downloadable project source code, you should also have the file MenuManager.cpp.non-avr that doesn’t use PROGMEM. Remove the .non-avr and use this file instead. It will still reference strcpy(). There may be some other problem in your project if you still get the same error. I hope this helps.
debounce issues with the push buttons. What file do I need to be in. .c or hpp.
Hi Phil, it’s possible you’re getting spurious readings in buttonHandlerCycle() of LcdKeypad.cpp. Try adding analogRead (BUTTON_PIN); in the line above the assignment to analogReading.
Hi!
Thank’s for sharing this. I find it most useful and the best menu example I’ve seen sofar. The code is somewhat intricate if you aren’t a proffesional programmer but after playing around I have a decent knowledge how it works. BUT, I have an issue that I can’t figure out:
In processMenuCommand I catch selected button and wan’t to send out the proper cmdId to serial (connected to an ESP for further processing). The problem is that there are a number of same cmdID with one button press (bouncing? timer function?) and I only wan’t to catch one.
I’ve tried with different approaches of a simple ‘state machine’, flag etc but without succes.
Where in code is the best way to save only one instance of last cmdiD ?
Suggestions howto ?
Best Regards Håkan
Hi, Thanks for the library. My select button seems not working…when put log for other button they seem to working but not select what could be the reason?
Good Morning:
Thanks you from Spain. The program is perfect.
Hey!
This is working absolutely great! Many thanks for posting your menu system. It is so easy to use.
I have a question: would it be possible for you to also publish the XML to header generator? I ask, because I’d like to integrate it in the PlatformIO scripts workflow, so that the MenuData.h can be autogenerated via a build phase script.
Right atm I am at the point to manually manipulate the files which works, but it would be nice only to change the XML and have everything processed automatically afterwards without having to go to your generator website.
Regards,
Holger
Hi Holger. I’m glad you found the menu generator useful. I have been thinking about converting the menu generator to a command line util, just like I’ve done with ‘Arduino Server Pages’ (ASPs) for web development, here https://youtu.be/F2KRuxAnosU
The menu generator has been developed using .net, which shouldn’t be a problem since .net is available on multiple platforms. It will probably be a few weeks before I make a start, but I guess that might be a bit late for you.
Kashif
Hey Kashif!
Many thanks for your answer and sorry, that I am late on reply, I got no info about your answer… That sounds really good. And no, it isn’t too late.
I am programming a rather complex motor control system and am still adding menus and submenus. And even more, I am changing the way I set the menu text by adding multi-language features and therefor it would be really cool to have a command line tool that I could modify for my needs and customize it perfectly. As example, atm, if I generate menus via the web page, I have to search’n’replace the fixed strings with some kind of multi-dimensional array a lot, but that could be totally eliminated if a simple modification of your then-be command line tool could be possible to further customize or better individualize the structure of the MenuData header file.
So, if you are still willing to convert your web page to a command line tool (.NET shouldn’t be a problem at all!) that would be great!
Regards,
Holger
Hi Again Holger, the menu builder project is available in Step 2 at the link Arduino LCD Menu Library.
Let us know how your project goes.
Kashif