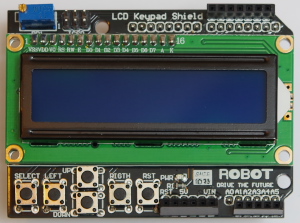
This countdown timer demonstrates practical use of our LCD menu library code. It features multiple timer profiles, and is targeted to work with Arduino R3 Uno/Leonardo/Mega2560 and LCD keypad shield similar to that in the picture below:
There are numerous manufacturers of LCD keypad shields that have the same or similar pin connections, and you must ensure that the timer source code uses the pin connections that are right for your shield. If the keypad buttons of your shield give different analog readings, you’ll need to make changes to file LcdKeypad.h. Bear in mind that the analog readings are not always consistent, which can lead to the occasional misreporting of a button press.
The count down timer has multiple profiles that are configurable using a menu. The Select button on the LCD shield starts/stops a timer, with a long press resetting the timer. A long press of Up enters the menu. Up/Down/Right buttons are for navigating the menu, and Select for choosing a menu item. When an item is selected, Up/Down are used for changing values. When the Reset menu item is displayed, a long press of Select loads default configuration values. Digital pin 2 is used for activating a beeper for the alarm.
The source code can be downloaded from the link below.
Examining the source should give you good insight for using the menu system in your own projects. If you find this timer useful, please share it. Thank you for reading.
Update! The TimerOne library dependency has been removed. You no longer need it to compile the project.
In file included from MenuManager.cpp:2:0:
MenuManager.cpp: In member function ‘void MenuManager::descendToChildMenu()’:
MenuManager.cpp:132:19: error: invalid conversion from ‘uint16_t {aka unsigned int}’ to ‘const MenuItem*’ [-fpermissive]
currentMenu = pgm_read_word(&(currentMenu[currentMenuItemIndexPos].childMenu));
Help?
Hi Rob. Try inserting (const MenuItem*) after the = sign. It’s quite possible you have different compiler settings enabled to mine.
That worked, thank you.
Hello, very nice code, It helped me a lot.
How do I delete timers 2 and 3. I only need timer 1.
Hello Miguel, please see the video. You can edit the menu xml file to remove the menu items you don’t need.
i am very new to arduino but when i try to press upload it says this:
Arduino: 1.6.12 (Mac OS X), Board: “Arduino/Genuino Mega or Mega 2560, ATmega2560 (Mega 2560)”
/Users/student/Downloads/LcdCountDownTimer/LcdCountDownTimer.ino:5:22: fatal error: TimerOne.h: No such file or directory
#include
^
compilation terminated.
exit status 1
Error compiling for board Arduino/Genuino Mega or Mega 2560.
This report would have more information with
“Show verbose output during compilation”
option enabled in File -> Preferences.
Hi Zach. You’ll need to find the timerone library (on the internet) and install it.
Hello Friend.
I loved your project, it’s just what I was looking for to better understand the lcd shield and the timers.
I have a problem, I do not work the “select” button in both arduino one, as mega.
It does not give me compilation error, it just does not work that button.
Do you know what it could be?
Thank you and congratulations for your work.
Hi David
It is possible that your select button is giving a different analog reading. I suggest you create a new project and try doing analogRead(0) and writing the result to the serial output to see what the value is.
Dear friend Kashif Baig
Lengths by beautiful design
I do not have much ability with the C ++ language I have to study more
I would like to have your help for my project
I need that when I run the countdown the digital signal of the alarm is high during all counting time and that when the signal is finished it is low.
Through this signal I will put in the base of a transistor driver to keep a relay closed during all counting and it will open at the end of the count.
Thanks for your help and best regards to all.
Alexandre
Dear friend
can any one tell me where can i get MenuData.h
Hi. This file is included in the downloadable project files. Essentially, it is a file where you paste menu code, overwriting existing file content.
Thank You.
Hi,
Great code! I’m currently operating on an arduino uni and using a DFrobot LCD keypad shield. The code works…except the select button does not. How will I fix this? I am really inexperienced with coding so I kind of need all the help i can get! if you could reply ASAP that’d be awesome.
Hi. In a separate Arduino project, perform an analogRead on pin A0 and output to the serial console. What values to you get?
Could I possibly have your email so I could talk to you faster?
it comes up with 5.00 when I do that though
Sorry, what I meant was what value(s) do you get from analogRead on pin A0 when you press the select button on the LCD shield?
I’m not exactly sure how to do this, email me: william.peters@spcc.nsw.edu.au
William, the following sketch will get you the analogRead values for each button. You’ll just need to edit the display config to match what you have, and the analogPin you have the buttons tied to.
#include
LiquidCrystal_I2C lcd(0x27, 20, 4);
int a=0;
void setup()
{
lcd.init();
lcd.init();
lcd.backlight();
pinMode(A12, INPUT_PULLUP);
}
void loop()
{
a = analogRead(12);
lcd.clear();
lcd.setCursor(0,0);
lcd.print(” analogRead() “);
lcd.setCursor(0,1);
lcd.print(” value is :”);
lcd.print(a);
delay(250);
}
Would you be able to help me edit the original code to do these things:
– Only have 1 timer option
– Once timer has reached zero, initiate digital pin 12 and 13 (I had LED’s attached to 12, and vibration motors attached to 13.)
If you could help me do this It would be greatly appreciated!
Does anyone know how I would be able to activate LEDs (Digital Pin 12) and Vibration motors (digital pin 13) when he timer value reaches 0? Could someone please help, I am very bad with code and any help would be amazing.
Hi there sir, just wanna know how can we put the Finger Print sensor on the LCD shield.
I mean the wiring of it.
We’re using the Wido board and the LCD shield same came from the DFRobot and a Finger print sensor.
We’re going to create a Senior citizen program using biometrics. And the thumbmark will be saved on our website is there any tutorial sir about the Wiring of the Finger print sensor on the LCD shield.
https://circuit.rocks/lcd-keypad-shield-for-arduino.html
https://circuit.rocks/wido-open-source-iot-node-arduino-cc3000?search=wido
heres the link we’re we bought our LCD shield and Wido board with specification of it’s hardware.
Thanks in advance for your help s
Hello,
ich have also the problem that the select button not work. but i have try another skeetch and its ok. i setup the working analog readings but the same problem.
select not working and if i pusch left it change the timers…
i hope anybody can help me…
my mail
guldokat@gmail.com
Hello,
I have also the problem that the select button not work.
Hello,
I get a long list of error messages related to the TimerOne library, I tried to downlod differents TimerOne libraries and get differents error messages depending on the library (one message example below)
could you point me to a download link for TimerOne that works for you ?
thank you for your help !
error message example :
libraries\TimerOne\TimerOne.cpp.o (symbol from plugin): In function `TimerOne::disablePwm(char)’:
(.text+0x0): multiple definition of `TimerOne::disablePwm(char)’
sketch\TimerOne.cpp.o (symbol from plugin):(.text+0x0): first defined here
c:/program files (x86)/arduino/hardware/tools/avr/bin/../lib/gcc/avr/4.9.2/../../../../avr/bin/ld.exe: Disabling relaxation: it will not work with multiple definitions
libraries\TimerOne\TimerOne.cpp.o (symbol from plugin): In function `TimerOne::disablePwm(char)’:
(.text+0x0): multiple definition of `__vector_20′
sketch\TimerOne.cpp.o (symbol from plugin):(.text+0x0): first defined here
libraries\TimerOne\TimerOne.cpp.o (symbol from plugin): In function `TimerOne::disablePwm(char)’:
(.text+0x0): multiple definition of `Timer1′
sketch\TimerOne.cpp.o (symbol from plugin):(.text+0x0): first defined here
libraries\TimerOne\TimerOne.cpp.o (symbol from plugin): In function `TimerOne::disablePwm(char)’:
…… etc,
Unfortunately, I don’t recall where I obtained the timer one library. It’s not crucial for the LCD menu to work, and can be removed, together with the code that depends on it.
Hello,
Great post ! Is it possible to add a Real Time Clock and change timers to start/stop at different days/hours in the week ?
Thank you
Where can i cahnge the “Timer 1” name?
Hi. Have a look in MenuData.h.
Hello.
I want to add a “servo motor” to this code and make it work if the timer is activated and the alarm goes off, but where should I put it?
p.s
The servo motor default To LcdCountDownTimer Add # include Servo.h and
I tried putting the basic code in the loop and setup, but it didn’t work and the timer stopped. What should I do?
Hi Kashif Baig
I try to run the motor when the buzzer sounds, what should I do?
And with init itmers () ; the servo motor can not drive.
I am going to use a tapping motor or a dc motor.
Hi Sir,
I got some error message and cannot upload . kindly please advice .My error message is like that
“WARNING: Category ‘Real-time clock’ in library DS3231 is not valid. Setting to ‘Uncategorized’
Build options changed, rebuilding all
C:\Users\User\Desktop\Arduino Current Test\LCD key pad shield with countdown timer\LcdCountDownTimer\LcdCountDownTimer.ino:5:22: fatal error: TimerOne.h: No such file or directory
#include
^
compilation terminated.
Multiple libraries were found for “LiquidCrystal.h”
Used: C:\Users\User\Documents\Arduino\libraries\LiquidCrystal
Not used: C:\Program Files (x86)\Arduino\libraries\LiquidCrystal
exit status 1
Error compiling for board Arduino/Genuino Uno.”
Hi,
very fine countdown timer .I uploaded and it work’s fine.
It can be done for the timer’s run at the same time ??
Sorry for the english i’m not very good at it.
Hi Catalin. The code only runs one timer at a time, although it will require significant changes for all the timers to be controlled at the same time.
Thanks
hello I took two days to understand your code ..
I congratulate you many because it makes the job very simple
and it is very intuitive for users similar to a real dropdown menu.
Thanks Luciano, I hope you find it useful.
Hello sir, i want to ask if how to add more Timer to the project?
I want to use 10 Timers and execute the timer sequentially
And can we use lcd and push button? not the lcd keypad shield.
Arduino:1.8.8 (Windows 10), Scheda:”Arduino/Genuino Uno”
sketch\Config.cpp: In member function ‘char* Config::getFormattedStr(byte)’:
Config.cpp:52:10: error: ‘mnuCmdT1Hours’ was not declared in this scope
case mnuCmdT1Hours :
:: :: :: :: :: :: :: :: :: :: :: ::
LcdCountDownTimer:431:10: error: ‘mnuCmdDisplayBrightness’ was not declared in this scope
case mnuCmdDisplayBrightness :
^
exit status 1
‘mnuCmdT1Hours’ was not declared in this scope
Questo report potrebbe essere più ricco di informazioni abilitando l’opzione
“Mostra un output dettagliato durante la compilazione”
in “File -> Impostazioni”
Hello,
I’m very new in Arduino, and may be this is a very simple to be done, but…
IS there a way to use this timer in a loop mode?
What I mean:
I want to TURN ON a bulb for a Minute (then turn it OFF) every 20 Minutes, until I stop this loop. This is a sample example.
Thank you in advance.
Best Rgards
Daniel
Years have gone by and no new code or answers to requested code. Why would anyone want to waste an Arduino on this when you can do all this on an Arduino without the shield and use your Arduino for hundreds of other projects as well. Why tie up your Arduino for only one singular function such as a countdown counter. Come on guys use your creativity!!
Hello Daniel. Have a look at our multi-function shield timer example, as the code is simpler, and you may be able to add your loop as required.