
If you haven’t done so already, please review the Android and Arduino Coding Fun page before continuing.
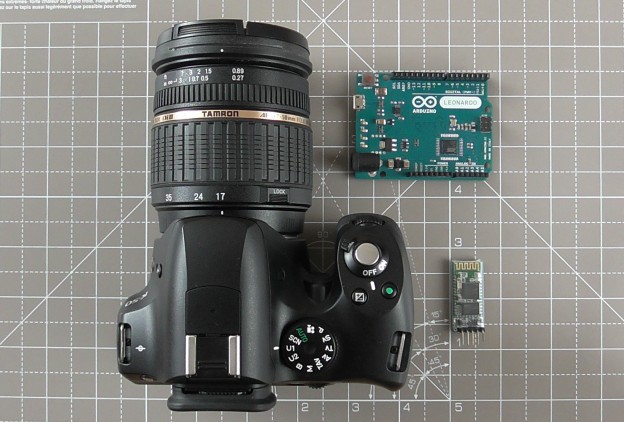
With this project the reader can use an Android device to remotely configure an Arduino controlled DSLR for time lapse photography. The intervalometer logic is all in the Arduino, with the Android used as a controller. You will need the following items in addition to the core items:
- A Canon/Nikon/Pentax DSLR and a remote shutter cable,
- Optocoupler ILD74, a bread board and 1 x 470R resistors,
- multi-function shield – this is optional, but you’ll still need to download the libraries
The reader may also find it useful to find information about how to re-purpose a remote shutter cable for their DSLR. Extensive camera remote release pinout information can be found at the link below:
The following Canon/Pentax and Nikon cables are a starting point. However, you must proceed at your own risk.
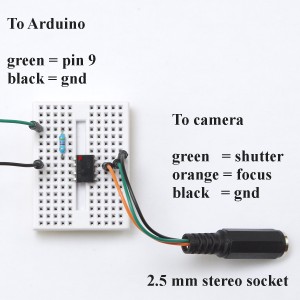
Arduino digital pin 9 is used for activating the shutter via the optocoupler, as illustrated in the images below. The camera should be set to manual focus with single shot drive. If the camera enters sleep mode after a period of inactivity, it might take a second or so to wake up when the focus/shutter button is pressed. If the button is not pressed long enough, the camera may not take a picture. In the (Arduino) source code, the shutter press time is set to 1.5 seconds for intervals longer than 10 seconds, and approximately 0.6 seconds for shorter intervals. Adjust to suit your camera. The image below shows how an optocoupler could be used to interface the Arduino to the DSLR:
The source code is available for download as follows:
- Android intervalometer app Source code, or install from Google Play,
- Arduino intervalometer source code,
- Multi-function shield library – need to install even if not using the shield
The video below demonstrates how to configure and use the Android Intervalometer app.
Don’t forget to like, share or comment!
Hello,
Thank you for this excellent article which works perfectly and which has the merit of greatly reducing the size of the function box.
I used a UNO 3 module directly and then a Pro mini 328 / 5V module.
However, I had some problems. I use an hc06 module and the pairing did not happen with the voltage divider but after looking on the internet pinning the hc06 I directly connected to the 5v. and the pairing was done. With difficulty however because I had to go through the application “BlueTerm”. Though recognized by the Android terminal, it did not natively appeal. BlueTerm has fixed this issue. Bizarre no?
Thanks again.
Christian
I’m glad you found it useful Christian.