Welcome to the second tutorial in our Practical Python series. In the previous tutorial, you learned how to connect your Python program to the Elecrow All-in-One Starter Kit for Arduino and respond to button events generated by the Robo-Tx API. This tutorial introduces another important practical concept – reading analog inputs.
Instead of detecting whether a button is simply pressed or released, you’ll learn how to measure a simple analog signal generated by the sliding potentiometer built into the All-in-One Starter Kit. By the end of this tutorial you’ll understand how the Robo-Tx API represents analog sensors and how its built-in conversion feature allows you to work with meaningful engineering values rather than raw hardware measurements.
Before You Begin
If you haven’t already prepared your hardware and Python environment, first follow the instructions provided in the GitHub repository. The Python example used in this tutorial (1-slider.py) can be found at the same repository.
Don’t have an All-in-One Starter Kit? The Python Programming: Robotics Foundation Course provides supervised tuition together with remote access to the same All-in-One Starter kit, allowing you to learn challenging Robo-Tx API and Python programming concepts from anywhere.
Tutorial Objectives
Building on the concepts of the previous tutorial, you will learn how to:
- read an analog sensor
- understand raw analog values
- convert analog readings into more meaningful units
- use converter functions to separate conversion logic from application code
These concepts are used throughout robotics, automation and embedded systems whenever sensors measure continuously varying quantities such as light level, temperature, sound, position or voltage.
What Are Analog Inputs?
Unlike the push button from the previous tutorial, which has only two possible states (pressed or released), the slider is an analog device. As you move the slider, the Arduino measures a continuously changing voltage.
This voltage is converted by the Arduino into a digital number ranging from:
- 0 (slider fully left)
- 1023 (slider fully right)
Every position between these two extremes produces a different value. The sliding potentiometer on the All-in-One Starter Kit is connected internally to Arduino analog input A0.
Understanding the Program
Although this program has similarities to the previous example, it introduces several new programming ideas.
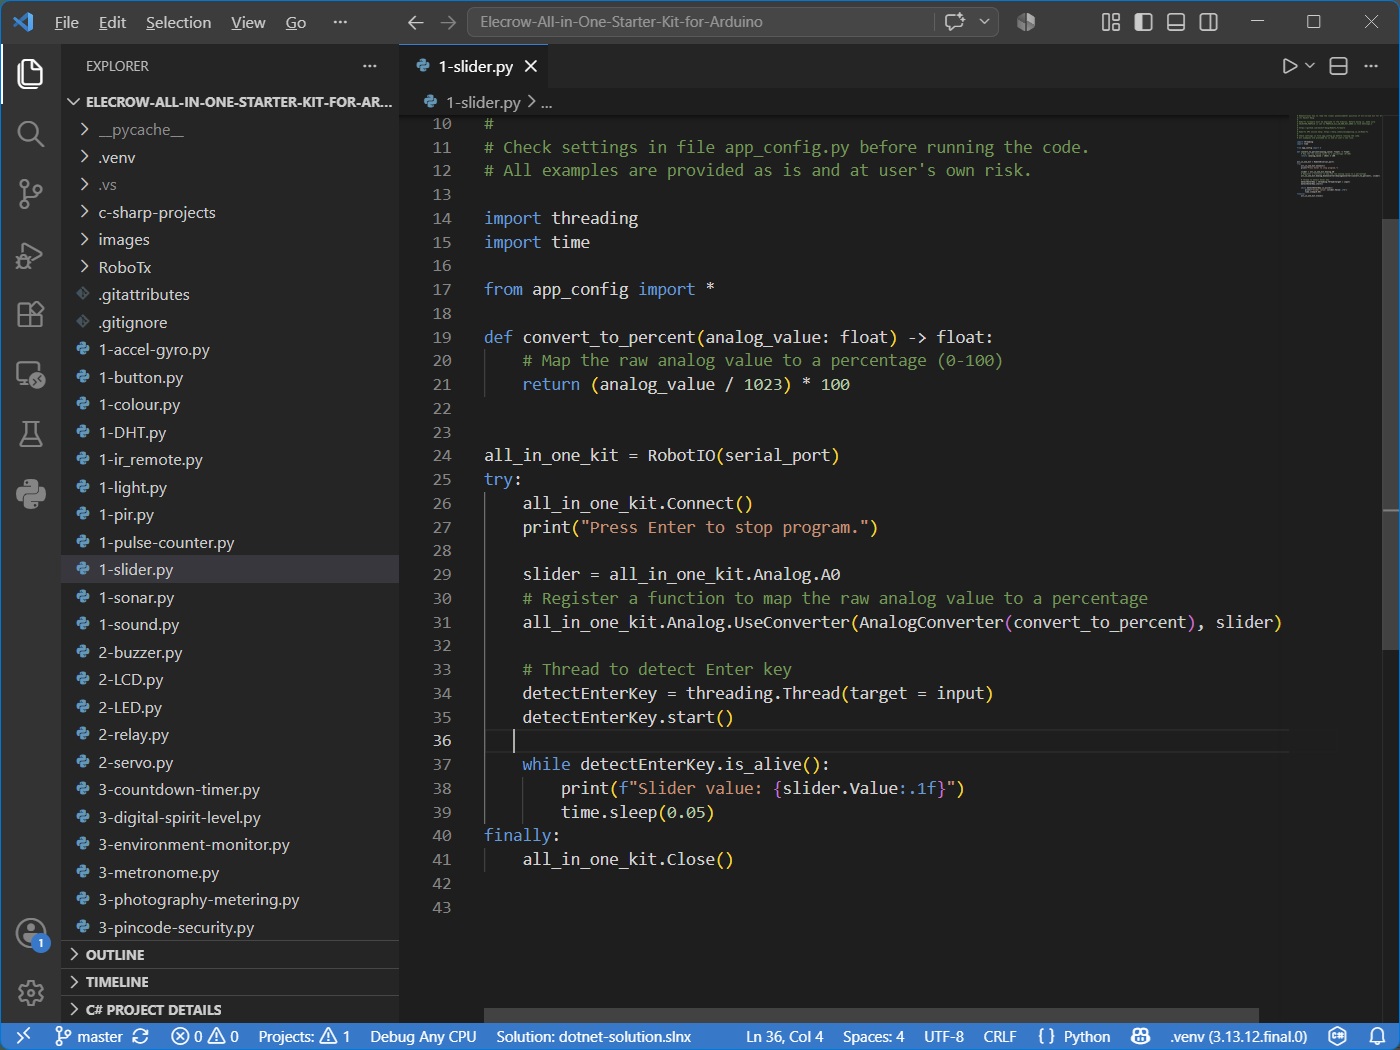
Connecting to the Hardware
The connection process is identical to that of the previous tutorial.
all_in_one_kit = RobotIO(serial_port)
all_in_one_kit.Connect()
The RobotIO object establishes communication with the Robo-Tx firmware running on the Arduino. Once connected, Python can begin reading the state of sensors attached to the board.
Accessing the Slider
The slider is represented by an object provided by the Robo-Tx API.
slider = all_in_one_kit.Analog.A0Notice that you are not reading a value here. Instead, you obtain a Python object representing analog input A0. This object exposes the Value property, which always contains the most recent reading from the slider. The object-oriented design of the Robo-Tx API keeps your code clean and intuitive.
Reading the Current Position
Once the slider object has been created, reading its current position is straightforward.
print(slider.Value)The Value property normally returns the raw analog reading between 0 and 1023. As the slider moves, this value changes continuously. You never need to communicate directly with the Arduino yourself—the Robo-Tx API keeps the value updated automatically.
Understanding Raw Values of Analog Inputs
Many beginner students wonder why the value ranges from 0 to 1023 instead of 0 to 100. The answer lies inside the Arduino. Its analog-to-digital converter measures voltages using 10 bits of precision. Ten binary digits can represent: 2¹⁰ = 1024 values. Since counting begins at zero, the available readings range from: 0 … 1023.
Although this is ideal for electronics, it is not always the most meaningful representation for application software.
For example, many users would rather see:
- 0–100%
- degrees Celsius
- centimetres
- litres
- motor speed
- battery percentage
This is exactly what the Robo-Tx analog converter feature was designed to achieve.
Converting Values Automatically
The example defines a simple Python function.
def convert_to_percent(analog_value: float) -> float:
    return (analog_value / 1023) * 100
This function accepts the raw analog value and converts it into a percentage. Examples include:
| Raw Value | Percentage |
| 0 | 0% |
| 256 | 25% |
| 512 | 50% |
| 768 | 75% |
| 1023 | 100% |
This conversion can make the analog value much easier for users to understand and work with.
Registering the Converter
The Robo-Tx API allows converter functions to be registered with an analog input.
all_in_one_kit.analog.UseConverter(analogConverter(convert_to_percent), slider)This is one of the elegant features of the API. Rather than requiring every part of your program to remember how to convert analog values, the conversion is attached directly to the analog input itself. After registration, every time your program accesses:
slider.Valuethe returned value has already been converted into a percentage. The rest of your application no longer needs to know anything about the original 0–1023 range.
Why Is This Good Software Design?
Separating conversion logic from application code has several advantages. Your program becomes easier to read because every part of the code works with meaningful values instead of hardware-specific numbers. It also becomes easier to maintain. Suppose a future project requires the slider to report values between 0 and 1 instead of percentages. Only the converter function needs to change. The remainder of the program can continue using slider.Value without modification. This separation of responsibilities is a common design principle used throughout professional software engineering.
Running the Program
The main loop is very simple.
while detectEnterKey.is_alive():
    print(f"Slider value: {slider.Value:.1f}")
    time.sleep(0.05)
As you move the slider backwards and forwards, the percentage displayed on the computer console changes smoothly between 0.0 and 100.0.
Meanwhile, the background thread continues waiting for the user to press Enter, allowing the program to terminate safely. Just like the previous tutorial, the hardware connection is closed automatically using the finally block.
Programming Concepts Covered
This example introduces several important Python and software engineering concepts:
- analog inputs
- object references
- object properties
- defining reusable functions
- conversion from raw to meaningful values
- abstraction using object orientation
- separation of concerns
Together with the previous tutorial, these examples begin to demonstrate how the Robo-Tx API hides much of the complexity of hardware communication, allowing you to concentrate on writing clear, readable Python code.
Challenge Exercises
Try extending the program yourself.
- Comment out the line of code that registers the converter function and re-run the program. Can you see the difference?
- Write and register a converter function that produces values between 0.0 and 1.0 from the raw analog value. The function must accept a parameter of type float, and return a value of type float.
- Only display the value when it changes. This will greatly reduce the amount of text printed to the console.
- Write and register a converter function that reverses the scale, so moving the slider to the right displays 0%, while moving it to the left displays 100%.
Looking Ahead
The slider is just one example of an analog sensor. The same programming techniques can be applied to many other analog input devices, including light sensors, temperature sensors, and microphones. The Elecrow All-in-One Start Kit for Arduino has an audio sensor connected to Arduino analog pin A1, and a connection socket attached to analog pin A6. Both of these pins are accessible via the Robo-Tx API in the same way as the slider.
In the next practical Python tutorial we’ll build a program to measure distance using the sonar module of the Elecrow All-in-One Starter Kit, and generate an audible alert that corresponds to the measured distance.
By gradually combining inputs, outputs and decision making in the following tutorials, you’ll build the practical Python skills needed for increasingly sophisticated robotics and automation projects using the Robo-Tx API.