In the previous practical Python tutorials, you learned how to respond to button events and read analogue inputs using the Robo-Tx API and the Elecrow All-in-One Starter Kit for Arduino. This tutorial combines several hardware devices to create a program for measuring distance with sonar, resembling a real-world vehicle parking sensor.
Using the ultrasonic sonar module of the Elecrow All-in-One Starter Kit, the Python program continuously measures the distance to nearby objects. The measured distance is displayed on the built-in LCD display, while the beeper provides audible feedback. As an object moves closer to the sensor, the beeps become more frequent until they merge into a continuous tone when the object is very close. This project demonstrates how multiple hardware components can work together to produce an interactive system using surprisingly little Python code.
Before You Begin
If you haven’t already prepared your hardware and Python environment, first follow the setup instructions in this GitHub repository. The Python example discussed in this tutorial (3-sonar-ranger.py) can be found at the same repository.
Don’t have an All-in-One Starter Kit? The Python Programming: Robotics Foundation Course provides supervised tuition together with remote access to the same All-in-One Starter kit, allowing you to learn challenging Robo-Tx API and Python programming concepts from anywhere.
Tutorial Objectives
In this tutorial you will learn how to:
- measure distance using an ultrasonic sensor
- display information on the LCD
- control the onboard beeper
- combine multiple hardware devices within one program
- respond to changing sensor values in real time
- create behaviour similar to a vehicle parking sensor
Along the way you’ll reinforce the programming techniques introduced in the previous tutorials, including object-oriented programming, loops, conditional statements and safe program termination.
How Does an Ultrasonic Sensor Work?
The sonar module measures distance using sound rather than light. When instructed to take a reading, it emits a very short ultrasonic pulse that is far above the range of human hearing. If the pulse strikes an object, part of the sound is reflected back towards the sensor. By measuring how long the echo takes to return, the Robo-Tx firmware calculates the distance between the sensor and the object.
This is exactly the same principle used by:
- vehicle parking sensors
- robotic obstacle detection
- industrial distance measurement systems
- mobile robots
- warehouse automation equipment
Understanding the Program
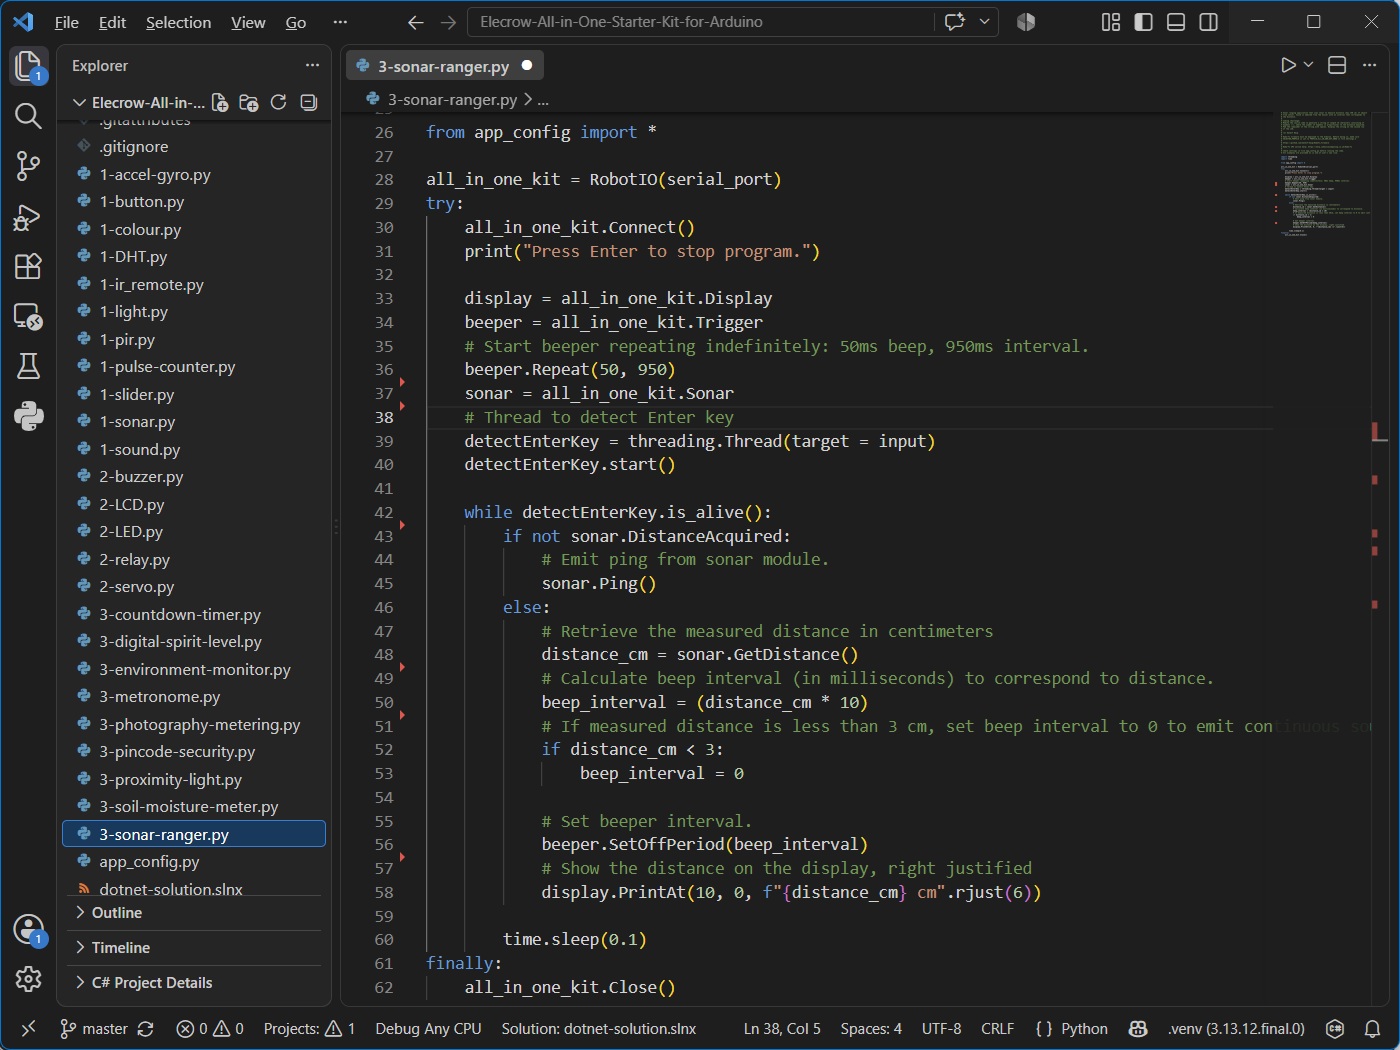
Much of the program will already look familiar. The Robo-Tx connection, Enter key detection thread and safe shutdown are identical to the previous tutorials, allowing us to concentrate on the new hardware features.
Accessing the Hardware
After connecting to the Arduino, the program creates three variables representing different devices on the All-in-One Starter Kit.
display = all_in_one_kit.Display
beeper = all_in_one_kit.Trigger
sonar = all_in_one_kit.Sonar
Each variable represents a different hardware component:
| Variable | Hardware |
| display | 16×2 LCD display |
| beeper | Piezo beeper |
| sonar | Ultrasonic distance sensor |
One of the strengths of the Robo-Tx API is that every hardware device is represented as a Python object with methods and properties that closely match its real-world behaviour.
Starting the Beeper
Before entering the main loop, the beeper is configured.
beeper.Repeat(50, 950)This tells the beeper to:
- sound for 50 milliseconds
- remain silent for 950 milliseconds
- repeat indefinitely
Initially the beeps occur approximately once every second. Later in the program you’ll see how the silent period is adjusted according to the measured distance.
Measuring Distance with Sonar
Unlike a button or slider, the sonar cannot simply be read continuously. Instead, each measurement happens in two stages. First, the program checks whether a previous measurement has completed.
if not sonar.DistanceAcquired:
    sonar.Ping()
Calling Ping() causes the ultrasonic sensor to emit a pulse. The Robo-Tx API then waits for the returning echo. This process takes a small amount of time, so the measurement is not immediately available. The main Python program can continue to perform other tasks in the meantime.
Obtaining the Measurement Result
Once the echo has returned, the measurement can be retrieved.
distance_cm = sonar.GetDistance()The returned value is the measured distance in centimetres. This makes the API particularly easy to use because the application receives a meaningful engineering value rather than needing to calculate it from raw timing information.
Turning Distance into Sound
One of the most interesting parts of the program converts the measured distance into the interval between beeps.
beep_interval = distance_cm * 10This simple calculation creates an intuitive relationship.
| Distance | Beep Interval |
| 100 cm | 1000 ms |
| 50 cm | 500 ms |
| 20 cm | 200 ms |
| 10 cm | 100 ms |
As the object moves closer, the silent period becomes shorter. The beeps therefore occur more rapidly, giving the user immediate audible feedback. This is how many vehicle reversing sensors work.
Detecting Very Close Objects
Eventually the object becomes extremely close to the sonar. The program checks for this condition as follows:
if distance_cm < 3:
    beep_interval = 0
Setting the interval to zero removes the silent period between beeps. Instead of hearing individual beeps, the user hears a continuous tone indicating that the object is now dangerously close. This demonstrates how a simple conditional statement can dramatically change the behaviour of a system.
Updating the Beeper
After calculating the interval, the beeper is updated.
beeper.SetOffPeriod(beep_interval)Notice that the program does not repeatedly start and stop the beeper. Instead, it simply changes the length of the silent period, i.e. the interval between beeps. The Robo-Tx API takes care of generating the repeating sound pattern automatically. This keeps the Python program concise and easy to understand.
Displaying the Distance
The measured distance is also displayed on the LCD screen.
display.PrintAt(10, 0, f"{distance_cm} cm".rjust(6))Several interesting things are happening here. The value is first converted into a text string using an f-string. The text is then right-justified so that the numbers remain neatly aligned as the distance changes. Finally, PrintAt() writes the text beginning at column 10 of row 0 of the display. Even though the displayed value changes continuously, the output remains tidy and easy to read.
Bringing Everything Together
The main loop performs four simple tasks repeatedly.
- Trigger a sonar measurement.
- Check when the measurement becomes available.
- Display the measured distance.
- Adjust the beeper according to that distance.
Together these steps create an interactive electronic system that responds continuously to its surroundings. This demonstrates one of the key concepts of robotics programming—combining several simple operations to produce useful behaviour.
Programming Concepts Covered
This example introduces several new programming concepts:
- ultrasonic distance measurement
- asynchronous sensor data acquisition
- coordinating multiple hardware devices
- displaying formatted information
- converting sensor readings into user feedback
- real-time monitoring
Together with the previous tutorials, you’re beginning to develop programs that read sensors, process information and control outputs in response. These three stages—sense, decide and act—form the basis of many robotic and automated system.
Challenge Exercises
See whether you can extend the program yourself.
- Display the message SAFE, CAUTION or STOP depending on the measured distance.
- Only update the LCD display when the measured distance changes. This reduces unnecessary communication with the display.
- Modify the program so the beeper only begins sounding when an object is closer than 50 cm. Use beeper.Off() to disable the beeper.
- Display both the measured distance and the current beep interval on the LCD.
Looking Ahead
This tutorial introduced one of the most widely used sensors in educational robotics and demonstrated how multiple hardware devices can cooperate to create a practical application. Namely, measuring distance with sonar, displaying the measured distance, and generating an audible alert. In the next practical Python tutorial you’ll learn about timing by examining a count down timer program. Timing in programming matters because computers do things fast and with precision, and the program often needs to coordinate when certain actions happen, not just what happens. Computers run many operations at once, and timing ensures outcomes occur in the right order and at the right speed.