Metronome for Musicians – Practical Python Tutorial Series

Welcome to the Final Tutorial

Throughout this practical tutorial series, you’ve progressively developed your Python programming skills by controlling real electronic hardware through the Robo-Tx API.

You started with relatively simple tasks such as responding to button presses and reading an analogue input. You then progressed to applications involving sensors, mathematical calculations, LCD output, timing and multiple forms of user interaction.

This final instalment brings many of those ideas together to create a fully interactive electronic metronome.

The project uses:

  • the slider to set the tempo
  • the button to start and stop the metronome
  • a longer button press to select the time signature
  • the beeper to produce the beats
  • the LED to identify the down-beat
  • the LCD to display the current beat, time signature and tempo

The result is a small but reasonably sophisticated application that demonstrates how Python can coordinate several physical inputs and outputs simultaneously.

Before You Begin

If you haven’t already prepared your hardware and Python environment, first follow the setup instructions in the GitHub repository. The Python example discussed in this tutorial (3-metronome.py) can be found at the same repository.

Don’t have an All-in-One Starter Kit? The Python Programming: Robotics Foundation Course provides supervised tuition together with remote access to the same All-in-One Starter kit, allowing you to learn challenging Robo-Tx API and Python programming concepts from anywhere.

What Is a Metronome?

A metronome produces regularly spaced beats to help musicians maintain a consistent tempo. Tempo is normally expressed in beats per minute (BPM).

For example:

  • 60 BPM  →  one beat every second
  • 120 BPM →  two beats every second
  • 240 BPM →  four beats every second

The All-in-One Starter Kit’s slider is used to select a tempo between 60 and 240 BPM.

The metronome also supports three time signatures: 2/4, 3/4 and 4/4. The first beat of each group is called the down-beat. This program distinguishes the down-beat from the other beats by producing a longer beep and flashing the LED. The remaining beats receive shorter beeps.

The Hardware Interface

The program uses four components from the All-in-One Starter Kit:

led = all_in_one_kit.Switch2
tempo_bpm = all_in_one_kit.Analog.A0
beeper = all_in_one_kit.Trigger
display = all_in_one_kit.Display
Python variableHardwarePurpose
ledLEDIndicates the down-beat
tempo_bpmSliderSelects tempo
beeperBeeperProduces beats
display16×2 LCDDisplays status

This illustrates one of the key advantages of the Robo-Tx API: Python code can interact with the physical components through meaningful objects and properties rather than having to deal with low-level Arduino communication.

Converting the Slider into BPM

The slider produces a raw analogue value between 0 and 1023. The program converts this into a BPM value in the range of 60 to 240:

def convert_to_bpm(value):
    return ((180 * value) / 1023) + 60

By registering the converter with the Robo-Tx API as demonstrated in a previous tutorial, the application can simply use the Value property of tempo_bpm to obtain the BPM:

tempo_bpm.Value

This keeps the application logic easier to understand and also demonstrates an important software-development principle: keep data conversion close to the source of the data, rather than repeatedly embedding conversion calculations throughout the application.

Representing the Time Signature

The time signature is represented by the variable signature, whose valid range is from 2 to 4. On the LCD the time signature is represented as 2/4, 3/4 and 4/4. A long press and release of the button cycles through the time signatures:

elif input_event == Input.BUTTON_1_SUSTAIN_RELEASED:
    signature += 1
    if signature > 4:
        signature = 2
    display.PrintAt(6, 0, f"{signature}/4")

Keeping Track of the Metronome

Several variables maintain the state of the application:

beat_counter = 0
beat_interval = 0
last_beat_time = datetime.now()
metronome_active = False

beat_counter records the current beat within the bar.

  • For 4/4 time, it cycles: 1 → 2 → 3 → 4 → 1 → …
  • For 3/4: 1 → 2 → 3 → 1 → …
  • For 2/4: 1 → 2 → 1 → …

beat_interval stores the time between beats in milliseconds.

last_beat_time records when the previous beat occurred.

metronome_active indicates whether the metronome is currently running.

Together, these variables provide the information required to control the timing and behaviour of the application.

Calculating the Beat Interval

The program calculates the interval (in milliseconds) between beats using:

beat_interval = 240_000 / (
    int(tempo_bpm.Value) * (4 if signature <= 4 else 8)
)

At first glance, this looks complicated. The important concept is that the interval between beats is related to the selected BPM.

For example, at 60 BPM, a quarter-note beat occurs once per second (1000 milliseconds). At 120 BPM, 2 beats per second (500 milliseconds interval).

Where the does the value 240000 come from? There are 60000 milliseconds in a minute. The factor of four in the calculation accounts for the relationship between the selected tempo and the quarter-note basis used by the metronome (2/4, 3/4 and 4/4).

The conditional expression also leaves the code prepared to accommodate an eighth-note-based signature in the future.

(4 if signature <= 4 else 8)

This is an example of designing code with a little flexibility beyond the immediate requirements.

Starting and Stopping the Metronome

A quick button release toggles the running state:

if input_event == Input.BUTTON_1_RELEASED:
	metronome_active = not metronome_active
	beat_counter = 0
	last_beat_time = datetime.now() - timedelta(
		milliseconds=beat_interval
	)

The beat counter is reset and the timing reference is adjusted. Why set last_beat_time to a value one beat interval in the past? Normally, last_beat_time represents when the previous beat occurred. When the metronome is started, there hasn’t actually been a previous beat. By setting the imaginary previous beat to one complete beat interval in the past, the program is requesting the next beat to be immediate. This allows the metronome to start promptly rather than waiting for a complete interval before producing its first beat.

Measuring Elapsed Time

The program determines how long it has been since the previous beat:

time_diff = (
    datetime.now() - last_beat_time
).total_seconds() * 1000

The result is converted into milliseconds. The program can then ask:

if metronome_active and time_diff >= beat_interval:

In other words, is the metronome running, and has enough time passed for another beat? If both conditions are true, another beat is generated.

The program contains an especially useful bit of timing logic for minimising time drift:

adjustment = time_diff - beat_interval
last_beat_time = datetime.now() - timedelta(
    milliseconds=adjustment
)

Suppose the beat should occur after 500 ms but the program checks after 507 ms. If the current time is simply recorded as the new reference, the next beat will also be scheduled 500 ms from this slightly late point. The error can accumulate. Instead, the program compensates for the additional seven milliseconds. This helps prevent timing errors from accumulating over time.

This is a good example of how real-world software sometimes needs to account for the fact that computers don’t execute instructions at perfectly predictable times.

Identifying the Down-Beat

The program determines whether the next beat is the first beat of the bar:

if beat_counter < 1 or beat_counter >= signature:
    beat_counter = 1

The condition handles both:

  • the first beat when the metronome starts
  • the transition from the final beat back to beat 1

When the down-beat occurs, the program performs two actions: the beeper produces a longer 100 ms pulse and the LED is illuminated for 0.1 seconds. This combination provides both an audible and visual indication of the beginning of each bar. For the remaining beats, a shorter beep is produced.

What Makes This a Good Project to End the Tutorial Series?

The metronome brings together almost everything you’ve encountered so far.

Inputs

  • analogue slider
  • button events

Processing

  • analogue conversion
  • arithmetic
  • conditional statements
  • counters
  • elapsed-time calculations
  • state management

Outputs

  • LCD
  • beeper
  • LED

Python features

  • functions
  • variables
  • Boolean logic
  • conditional statements
  • loops
  • object properties
  • object methods
  • datetime
  • timedelta
  • string formatting

The project therefore demonstrates how individual programming techniques can be combined to create a complete interactive application.

Challenge Exercises

The supplied program is a working solution, but don’t stop there. Try modifying it.

  • Add a 6/8 Time Signature – extend the program so that the available signatures include: 2/4, 3/4, 4/4, 6/8. The existing beat interval calculation has deliberately been structured to allow for an eighth-note-based signature.
  • Change the Tempo Range – change the convert_to_bpm() function so that the slider controls a different tempo range, 40-200 BPM.

Continue Your Practical Python Learning

If you’ve enjoyed using Python to control real hardware and want to develop these skills further, find out more about the Python Programming: Robotics Foundation Course.

The course builds on Python programming fundamentals and applies them to practical robotics and electronics projects using the Robo-Tx API and the Elecrow All-in-One Starter Kit.
Photography Light Meter – Practical Python Tutorial Series

In the previous tutorials, you’ve used Python with the Elecrow All-in-One Starter Kit for Arduino to respond to button events, read analogue inputs, measure distance with the ultrasonic sonar module and combine several hardware components to build a countdown timer.

This practical Python tutorial takes another step forward by combining sensor data, user input, mathematical calculations and an LCD display to create a practical photography application. Namely, a simple photography light meter using the All-in-One Starter Kit.

The light meter measures the amount of light falling on the sensor in lux (LUX). The slider selects a shutter speed, the button cycles through ISO sensitivity settings, and the Python code calculates an appropriate F-stop (aperture) value. The resulting exposure information is displayed on the kit’s 16×2 LCD. This project is particularly useful because it demonstrates how Python can be used to process real-world measurements and turn them into useful information.

Before You Begin

If you haven’t already prepared your hardware and Python environment, first follow the setup instructions in this GitHub repository. The Python example discussed in this tutorial (3-photography-metering.py) can be found at the same repository.

Don’t have an All-in-One Starter Kit? The Python Programming: Robotics Foundation Course provides supervised tuition together with remote access to the same All-in-One Starter kit, allowing you to learn challenging Robo-Tx API and Python programming concepts from anywhere.

Photography Light Meter Overview

A photography light meter measures the amount of light available for taking a photograph. When a photographer takes a photograph, three important settings are commonly considered:

  • Aperture — represented by the F-stop
  • Shutter speed — how long the camera’s shutter remains open
  • ISO — the sensitivity of the camera sensor

These settings are closely related. This project uses two settings supplied by the user:

  • the slider selects the shutter speed
  • the button selects the ISO sensitivity

The light meter sensor supplies the amount of available light. The Python code then calculates an appropriate aperture and displays the resulting F-stop. The LCD then displays the calculated exposure information.

Importing the Required Modules

The program starts with the import of required modules. Most of these imports have appeared in earlier tutorials. The new module is:

import math

The math module provides mathematical functions, including sqrt(), which is used later to calculate the F-stop.

Selecting Shutter Speeds

The program defines a Python list containing common shutter speeds:

SHUTTER_SPEEDS = [
    3, 4, 5, 6, 10, 13, 15, 20, 25, 30, 40, 50, 60, 80,
    100, 125, 160, 200, 250, 320, 400, 500, 640, 800, 1400
]

In previous tutorials, the slider represented a continuous range of values. Here, the slider is being used as a selector. Moving the slider doesn’t produce every possible shutter speed. Instead, its position selects the nearest entry from the SHUTTER_SPEEDS list.

This is a useful programming technique whenever a physical control needs to select from a predefined set of choices.

The mapping of the slider position to shutter speed is performed by the Python function:

def map_to_shutter_speed(analog_value: float) -> float:
    '''Maps analog value of sliding potentiometer to the nearest shutter speed.'''
    max_index = len(SHUTTER_SPEEDS) - 1
    index = int((max_index * analog_value) / 1023)
    index = max(0, min(index, max_index))
    return SHUTTER_SPEEDS[index]

This function is registered with the Robo-Tx API in the same way as other analogue converter functions in previous tutorials. The rest of the program can simply read:

shutter.Value

without needing to know how the slider position was converted to a shutter value.

Understanding the Mapping

The slider produces a raw value between 0 and 1023. The function first determines the largest valid list index:

max_index = len(SHUTTER_SPEEDS) - 1

Since Python lists start at index zero, this gives the index of the final shutter speed. The slider value is then converted into an appropriate list index:

index = int((max_index * analog_value) / 1023)

The function contains another interesting line:

index = max(0, min(index, max_index))

This ensures that the calculated index cannot fall outside the valid range. This is called clamping a value. Although the expected analogue range is 0–1023, defensive programming like this makes the function safer and more robust.

The result is then used to select a shutter speed from the list:

return SHUTTER_SPEEDS[index]

This mapping function provides a useful example of combining: lists, indexes, arithmetic, functions and analogue input to support a physical user interface.

Preparing the Light Meter

After the program obtains the light meter object representing the light meter sensor, the sensor is enabled:

light_meter = all_in_one_kit.LightMeter
light_meter.Enable()

However, enabling the sensor does not necessarily mean that it is immediately ready to provide a valid reading. The program therefore waits:

all_in_one_kit.WaitUntilSensorsReady(light_meter)

This is an important concept when working with real hardware. Some sensors require time to initialise, stabilise or perform internal measurements before reliable data becomes available. Rather than repeatedly trying to use a sensor that isn’t ready, the program explicitly waits for the sensor to become available.

Reading the Light Level

Once the light meter is ready, its current reading can be accessed through:

light_meter.LuxValue

The value represents the measured illumination in lux. The program uses this value directly in its exposure calculation. This is another example of the Robo-Tx API presenting hardware information in a form that is immediately useful to Python programs.

Selecting the ISO Setting

The initial ISO value is set to 100. The short button press then cycles through ISO settings.

if input_event == Input.BUTTON_1_RELEASED:
    iso *= 2
    if iso > 800:
        iso = 100

The value therefore progresses through:

100 → 200 → 400 → 800 → 100 → ...

This is a particularly nice example of using a single physical button to implement a cyclic selection control. There is no need for separate buttons for increasing and decreasing the ISO. The selected ISO value is then displayed on the LCD on column 6 of row 0.

Calculating the F-Stop

The central calculation in the program is illustrated below:

f_stop = math.sqrt(
    (light_meter.LuxValue * iso * (1 / shutter.Value))
    / calibration_const
)

This is where the project becomes more than a simple hardware demonstration. The Python program takes information from the light meter sensor, ISO and shutter speed, and combines them mathematically to calculate the F-stop (aperture) value.

The actual shutter speed is determined by the reciprocal of the shutter-speed value obtained from SHUTTER_SPEEDS, so for example a value of 50 will result in the shutter speed of 1/50 second.

The program also defines a calibration constant, which is used to scale the calculation so that the resulting F-stop is appropriate for the light meter application.

Not every combination of light level, ISO and shutter speed will produce a usable F-stop. Only values between F1.8 and F22 are considered suitable for display. If the calculated F-stop falls outside the supported range, the program displays Error instead.

The Completed Display

With the calculated F-stop, selected ISO and shutter speed values available, the first row of the LCD might therefore look something like:

F5.6  200  1/125

with the second row showing corresponding labels:

 A     S      T

Moving the slider changes the shutter speed, pressing the button changes the ISO, and changing the light level falling on the light sensor changes the measured LUX value. Since the program runs in a loop, the calculated F-stop therefore continues to respond dynamically to all three inputs.


Programming Concepts Covered

This practical Python tutorial introduces several new Python concepts while reinforcing many of the skills from earlier tutorials:

  • Lists – The shutter speeds are stored in SHUTTER_SPEEDS. Students can therefore see how a collection of related values can be represented using a Python list.
  • List indexing – The calculated index selects an individual shutter speed from the list.
  • Mathematical operations – integer conversion, minimum and maximum values, square roots
  • Validation – The calculated F-stop is checked before being displayed.
  • Sensor initialisation – The program explicitly enables the light sensor and waits for it to become ready before attempting to use it.

Challenge Exercises

Try extending the photography light meter program yourself to meet the following changes in requirements:

  • Detect the button press event Input.BUTTON_1_SUSTAINED to ‘freeze’ the display on a long button press so it does not update until the next long button press event.
  • Create and use a Python list of ISO values, and cycle through each list entry when the button is pressed.
  • Modify the program such that the slider chooses from a selection of F-stop values and calculates and displays an optimum shutter speed.

Looking Ahead

The photography light meter is another example of what becomes possible when Python programming is connected to real hardware: a relatively small Python program can turn a collection of inexpensive electronic components into a useful, interactive instrument.

The next and final practical Python tutorial in this series will be a metronome application that allows the music student to use the Elecrow All-in-One Starter Kit for Arduino to select a time signature and beats-per-minute to produce regular controlled beeps.

Countdown Timer – Practical Python Tutorial Series

Welcome to the fourth instalment of our practical Python tutorial series. In the previous tutorials, you learned how to use Python with the Elecrow All-In-One Starter Kit for Arduino to:

  • respond to button events using the Robo-Tx API
  • read an analogue input and convert its value into a useful range
  • measure distance with the ultrasonic sonar module
  • display information on the LCD
  • control the All-in-One Starter Kit’s beeper

This tutorial brings many of these techniques together to create a more substantial application: a 60-minute countdown timer.

The timer uses the slider on the Elecrow All-in-One Starter Kit to select a duration, the button to control the timer, the LCD to display the remaining time and the beeper to provide an alarm when the countdown finishes.

More importantly, this project introduces two Python classes from the datetime module:

  • datetime
  • timedelta

These provide a much better way of working with elapsed time than repeatedly incrementing or decrementing a counter.

Before You Begin

If you haven’t already prepared your hardware and Python environment, first follow the setup instructions in the GitHub repository. The Python example discussed in this tutorial (3-countdown-timer.py) can be found at the same repository.

Don’t have an All-in-One Starter Kit? The Python Programming: Robotics Foundation Course provides supervised tuition together with remote access to the same All-in-One Starter kit, allowing you to learn challenging Robo-Tx API and Python programming concepts from anywhere.

The Countdown Timer Overview

The finished program behaves like a simple kitchen or laboratory timer. When the countdown is not running:

  • moving the slider selects the duration
  • the selected duration is displayed on the LCD
  • a short button press starts the countdown
  • a long button press resets the timer to the current slider position

When the countdown is running:

  • the LCD shows the remaining time
  • a short button press pauses the countdown
  • another short press resumes it

When the countdown reaches zero:

  • the countdown stops
  • an alarm pattern is played through the beeper
  • pressing the button cancels the alarm

The maximum duration is 60 minutes, and the slider selects the duration in increments of ten seconds.

The Program Structure and Design

The beginning of the program will look familiar.

import threading
import time
from datetime import datetime, timedelta
from app_config import *

The threading and time modules were introduced in earlier tutorials. The new import is:

from datetime import datetime, timedelta

These two classes provide the facilities needed to calculate when the countdown has elapsed.

Why Use datetime?

One way of implementing a countdown would be to subtract one second from a variable every second. However, that approach can become inaccurate because the computer is also performing other operations. Instead, this program records the actual target time at which the countdown should finish.

For example:

target_time = datetime.now() + timedelta(seconds=60)

This means: Take the current time and add 60 seconds. The resulting target_time represents the precise point at which the countdown should reach zero. The program can then repeatedly ask: How much time remains between now and the target time? This is a useful programming technique whenever an application needs to work with elapsed time.

Converting the Slider Value into a Duration

The sliding potentiometer all the All-in-One Starter Kit produces a raw analogue value between 0 and 1023. As you learned in the tutorial for reading analog inputs, this value can be converted before your application uses it.

This program defines a function for such a conversion:

def convert_to_duration(value):
    '''Convert raw analog value to duration as seconds, in tens of seconds.'''
    return int((360 * value) / 1023) * 10

The important part is the calculation:

int((360 * value) / 1023) * 10

The raw value is first mapped onto an integer range of 0 to 360, then multiplied by 10. The resulting range is therefore 0 … 3600 seconds. Since 3600 seconds is one hour, the slider can select a maximum duration of 60 minutes. The multiplication by 10 means that the duration changes in increments of ten seconds.

For example:

Analog value based on slider positionApproximate duration
00 seconds
17110 minutes
34120 minutes
51230 minutes
102360 minutes

The exact intermediate values depend on the analogue reading.

Registering the Converter Function

The converter function is registered in exactly the same way as in the Reading Analog Inputs tutorial:

slider = all_in_one_kit.Analog.A0
all_in_one_kit.Analog.UseConverter(AnalogConverter(convert_to_duration), slider)

This is an important feature of the Robo-Tx API. Once the converter has been registered, the program can simply use:

slider.Value

and receive a duration in seconds rather than the original 0–1023 analogue reading. The conversion logic is therefore kept separate from the code that uses the duration.

Formatting the Countdown for Display

The second function defined in the program is:

def to_time_format(seconds):
    '''Convert seconds to MM:SS format for display.'''
    return f"{seconds // 60:02}:{str(seconds % 60).zfill(2)}"

This function converts a number of seconds into a format suitable for the LCD. For example:

SecondsFormatted for Display
000:00
1000:10
6001:00
60010:00
360060:00

The display uses minutes and seconds, rather than hours and minutes. Even though the maximum duration is one hour, 60:00 is therefore displayed at the beginning of a maximum-length countdown.

Understanding the Formatting Code

There are two useful bits of Python in this function.

First:

seconds // 60

uses integer division to calculate the number of complete minutes. The remaining seconds are obtained using the modulo operator:

seconds % 60

For 90 seconds:

90 % 60 = 30

The two values can therefore be combined to produce the remaining time in the format MM:SS. This is a good example of how relatively simple Python operators can be combined to solve a practical problem.

Tracking the Countdown Timer State

The program uses three Boolean variables to keep track of what the timer is doing:

countdown_running = False
timer_reset = True
alarm_sound_active = False

These variables represent three different aspects of the application’s state.

  • countdown_running Indicates whether the countdown is currently active.
  • timer_reset Indicates that the timer duration needs to be obtained from the slider.
  • alarm_sound_active Indicates whether the timer has reached zero and the alarm is currently sounding.

Using Boolean variables to represent the state of an application is a common programming technique and is particularly useful when building interactive systems.

Starting or Resuming the Countdown

When the timer isn’t running, the program checks for a button release with an if statement. A short press and release therefore starts the countdown.

The important line is:

target_time = datetime.now() + timedelta(seconds=timer_value_seconds)

The current time is obtained and the selected duration is added to it. The result is the exact time at which the countdown should finish. If there is no remaining time left for the countdown, the countdown running state is set to false.

Pausing the Countdown

While the countdown is running, another short button press stops it:

if input_event == Input.BUTTON_1_RELEASED:
    countdown_running = False

The countdown isn’t reset. The remaining time is retained in:

timer_value_seconds

This means that pressing the button again can resume the countdown.

Using a Long Button Press to Reset

The program also makes use of the sustained button event introduced in the first tutorial. When the countdown isn’t running, holding the button resets the timer to a duration determined by the current slider position.

This provides a useful distinction between a short press and a long press:

Button actionTimer action
Short pressStart/resume
Short press while runningPause
Long press while stoppedReset using current slider position
Button press during alarmCancel alarm

This is a good example of how a small number of input events can provide several different controls without requiring additional buttons.

Updating the Countdown

While the countdown is running, the program calculates the remaining time:

timer_value_seconds = int((target_time - datetime.now()).total_seconds())

This is an important piece of code that obtains the difference between the target time and the current time, represented in seconds. The result is then converted to an integer and displayed on column 0 and row 0 of the LCD using:

display.PrintAt(0, 0, to_time_format(timer_value_seconds))

As the target time approaches, the displayed value decreases.

Detecting the End of the Countdown

The program checks:

if timer_value_seconds <= 0:

Once the countdown reaches zero, several things happen:

countdown_running = False
alarm_sound_active = True
beeper.RunPattern(50, 50, 4, 3, 500)

The timer is stopped and the alarm active state is set to true. The beeper is then instructed to play a repeating pattern. In this example the pattern produces:

  • a group of four short beeps
  • repeated three times
  • with a 500 ms interval between groups

Conceptually, the resulting alarm sounds like: beep beep beep beep    beep beep beep beep    beep beep beep beep. The exact timing of the individual beeps is specified by the arguments passed to RunPattern(). This demonstrates the Robo-Tx API allowing the Python programmer to describe what they want the hardware to do without having to implement the low-level timing themselves.

Programming Concepts Covered

This practical Python example introduces several new Python concepts while reinforcing those from earlier tutorials.

  • datetime
  • timedelta
  • calculating elapsed time
  • formatting numerical values
  • state-based program logic
  • reusable functions for data conversion
  • complex conditional expressions

The increasing complexity is intentional. Rather than introducing completely unrelated examples, each tutorial combines techniques from previous exercises and adds another layer of programming.


Challenge Exercises

Now try modifying the countdown timer program yourself with these new requirements:

  • Modify convert_to_duration() so that the maximum countdown is 30 minutes instead of 60 minutes.
  • Make the beeper produce warning beeps when the countdown reaches 10 seconds remaining. Use beeper.Repeat(500, 500) for the warning beeps.
  • Use the LCD to create a simple progress indicator, e.g. [##########——]. The number of characters in the progress bar should represent the proportion of the countdown that has elapsed. The maximum number of characters the LCD can display on one row is 16.

Looking Ahead

The next practical Python tutorials will continue this progression by introducing more of the sensors and actuators available on the Elecrow All-in-One Starter Kit for Arduino. The ultimate goal isn’t simply to learn how to operate the All-in-One Starter Kit. It is to use the hardware as a practical environment in which you can develop real Python programming and robotics software development skills.

Measuring Distance with Sonar – Practical Python Tutorial Series

In the previous practical Python tutorials, you learned how to respond to button events and read analogue inputs using the Robo-Tx API and the Elecrow All-in-One Starter Kit for Arduino. This tutorial combines several hardware devices to create a program for measuring distance with sonar, resembling a real-world vehicle parking sensor.

Using the ultrasonic sonar module of the Elecrow All-in-One Starter Kit, the Python program continuously measures the distance to nearby objects. The measured distance is displayed on the built-in LCD display, while the beeper provides audible feedback. As an object moves closer to the sensor, the beeps become more frequent until they merge into a continuous tone when the object is very close. This project demonstrates how multiple hardware components can work together to produce an interactive system using surprisingly little Python code.

Before You Begin

If you haven’t already prepared your hardware and Python environment, first follow the setup instructions in this GitHub repository. The Python example discussed in this tutorial (3-sonar-ranger.py) can be found at the same repository.

Don’t have an All-in-One Starter Kit? The Python Programming: Robotics Foundation Course provides supervised tuition together with remote access to the same All-in-One Starter kit, allowing you to learn challenging Robo-Tx API and Python programming concepts from anywhere.

Tutorial Objectives

In this tutorial you will learn how to:

  • measure distance using an ultrasonic sensor
  • display information on the LCD
  • control the onboard beeper
  • combine multiple hardware devices within one program
  • respond to changing sensor values in real time
  • create behaviour similar to a vehicle parking sensor

Along the way you’ll reinforce the programming techniques introduced in the previous tutorials, including object-oriented programming, loops, conditional statements and safe program termination.

How Does an Ultrasonic Sensor Work?

The sonar module measures distance using sound rather than light. When instructed to take a reading, it emits a very short ultrasonic pulse that is far above the range of human hearing. If the pulse strikes an object, part of the sound is reflected back towards the sensor. By measuring how long the echo takes to return, the Robo-Tx firmware calculates the distance between the sensor and the object.

This is exactly the same principle used by:

  • vehicle parking sensors
  • robotic obstacle detection
  • industrial distance measurement systems
  • mobile robots
  • warehouse automation equipment

Understanding the Program

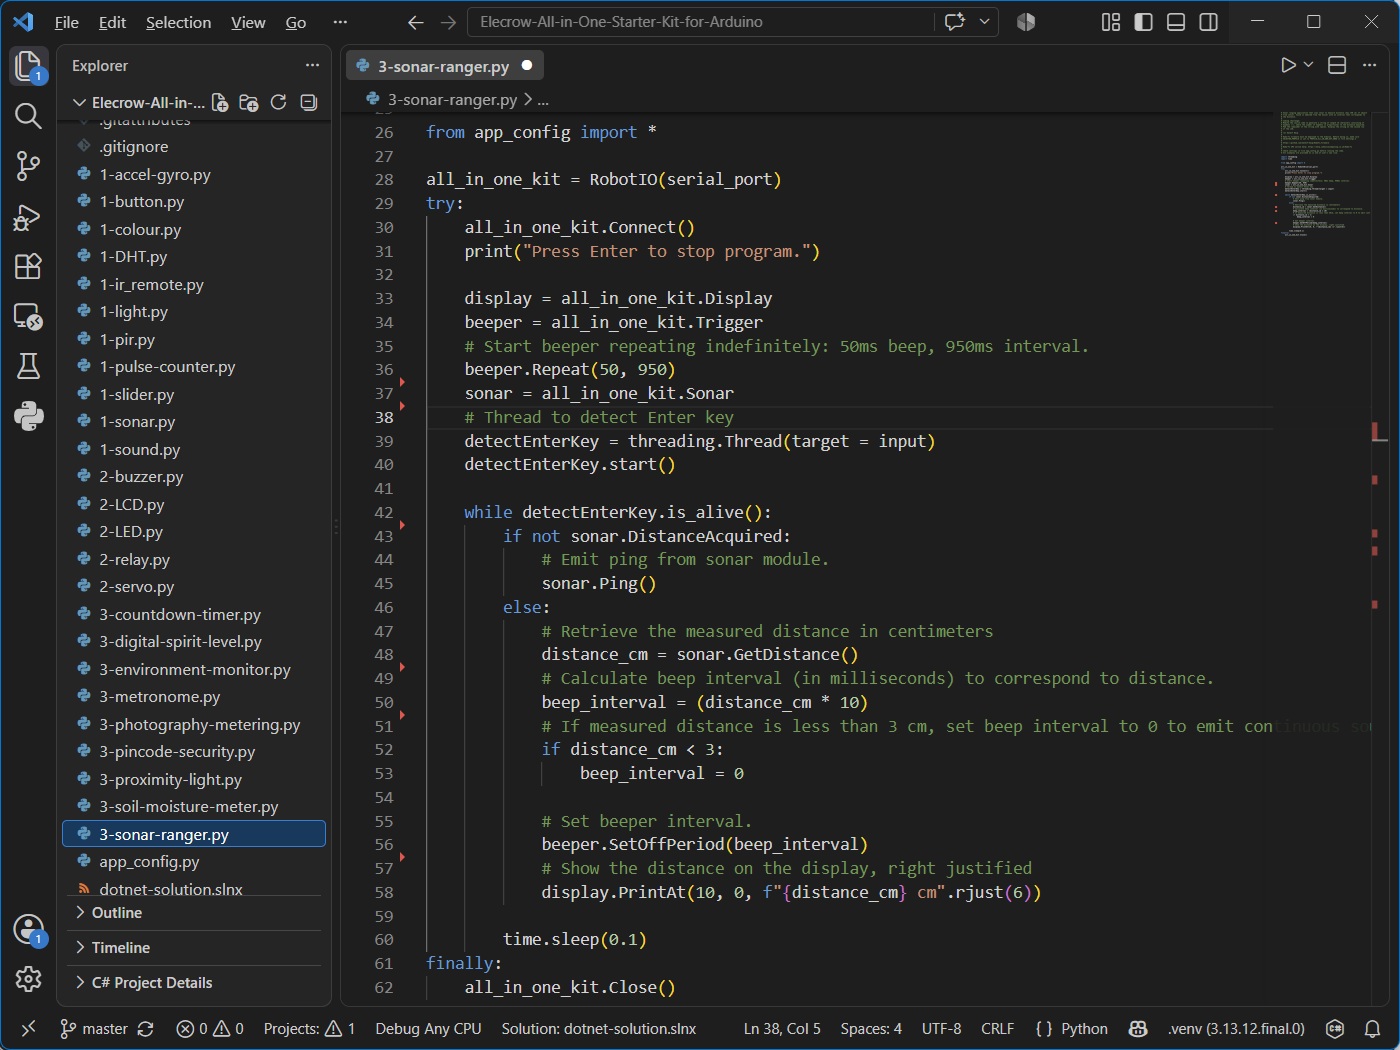
Much of the program will already look familiar. The Robo-Tx connection, Enter key detection thread and safe shutdown are identical to the previous tutorials, allowing us to concentrate on the new hardware features.

Screenshot of Python code for measuring distance using sonar module of the Elecrow All-in-One Starter kit for Arduino
Screenshot of Python code for measuring distance using sonar module of the Elecrow All-in-One Starter kit for Arduino.

Accessing the Hardware

After connecting to the Arduino, the program creates three variables representing different devices on the All-in-One Starter Kit.

display = all_in_one_kit.Display
beeper = all_in_one_kit.Trigger
sonar = all_in_one_kit.Sonar

Each variable represents a different hardware component:

VariableHardware
display16×2 LCD display
beeperPiezo beeper
sonarUltrasonic distance sensor

One of the strengths of the Robo-Tx API is that every hardware device is represented as a Python object with methods and properties that closely match its real-world behaviour.

Starting the Beeper

Before entering the main loop, the beeper is configured.

beeper.Repeat(50, 950)

This tells the beeper to:

  • sound for 50 milliseconds
  • remain silent for 950 milliseconds
  • repeat indefinitely

Initially the beeps occur approximately once every second. Later in the program you’ll see how the silent period is adjusted according to the measured distance.

Measuring Distance with Sonar

Unlike a button or slider, the sonar cannot simply be read continuously. Instead, each measurement happens in two stages. First, the program checks whether a previous measurement has completed.

if not sonar.DistanceAcquired:
    sonar.Ping()

Calling Ping() causes the ultrasonic sensor to emit a pulse. The Robo-Tx API then waits for the returning echo. This process takes a small amount of time, so the measurement is not immediately available. The main Python program can continue to perform other tasks in the meantime.

Obtaining the Measurement Result

Once the echo has returned, the measurement can be retrieved.

distance_cm = sonar.GetDistance()

The returned value is the measured distance in centimetres. This makes the API particularly easy to use because the application receives a meaningful engineering value rather than needing to calculate it from raw timing information.

Turning Distance into Sound

One of the most interesting parts of the program converts the measured distance into the interval between beeps.

beep_interval = distance_cm * 10

This simple calculation creates an intuitive relationship.

DistanceBeep Interval
100 cm1000 ms
50 cm500 ms
20 cm200 ms
10 cm100 ms

As the object moves closer, the silent period becomes shorter. The beeps therefore occur more rapidly, giving the user immediate audible feedback. This is how many vehicle reversing sensors work.

Detecting Very Close Objects

Eventually the object becomes extremely close to the sonar. The program checks for this condition as follows:

if distance_cm < 3:
    beep_interval = 0

Setting the interval to zero removes the silent period between beeps. Instead of hearing individual beeps, the user hears a continuous tone indicating that the object is now dangerously close. This demonstrates how a simple conditional statement can dramatically change the behaviour of a system.

Updating the Beeper

After calculating the interval, the beeper is updated.

beeper.SetOffPeriod(beep_interval)

Notice that the program does not repeatedly start and stop the beeper. Instead, it simply changes the length of the silent period, i.e. the interval between beeps. The Robo-Tx API takes care of generating the repeating sound pattern automatically. This keeps the Python program concise and easy to understand.

Displaying the Distance

The measured distance is also displayed on the LCD screen.

display.PrintAt(10, 0, f"{distance_cm} cm".rjust(6))

Several interesting things are happening here. The value is first converted into a text string using an f-string. The text is then right-justified so that the numbers remain neatly aligned as the distance changes. Finally, PrintAt() writes the text beginning at column 10 of row 0 of the display. Even though the displayed value changes continuously, the output remains tidy and easy to read.

Bringing Everything Together

The main loop performs four simple tasks repeatedly.

  1. Trigger a sonar measurement.
  2. Check when the measurement becomes available.
  3. Display the measured distance.
  4. Adjust the beeper according to that distance.

Together these steps create an interactive electronic system that responds continuously to its surroundings. This demonstrates one of the key concepts of robotics programming—combining several simple operations to produce useful behaviour.

Programming Concepts Covered

This example introduces several new programming concepts:

  • ultrasonic distance measurement
  • asynchronous sensor data acquisition
  • coordinating multiple hardware devices
  • displaying formatted information
  • converting sensor readings into user feedback
  • real-time monitoring

Together with the previous tutorials, you’re beginning to develop programs that read sensors, process information and control outputs in response. These three stages—sense, decide and act—form the basis of many robotic and automated system.


Challenge Exercises

See whether you can extend the program yourself.

  • Display the message SAFE, CAUTION or STOP depending on the measured distance.
  • Only update the LCD display when the measured distance changes. This reduces unnecessary communication with the display.
  • Modify the program so the beeper only begins sounding when an object is closer than 50 cm. Use beeper.Off() to disable the beeper.
  • Display both the measured distance and the current beep interval on the LCD.

Looking Ahead

This tutorial introduced one of the most widely used sensors in educational robotics and demonstrated how multiple hardware devices can cooperate to create a practical application. Namely, measuring distance with sonar, displaying the measured distance, and generating an audible alert. In the next practical Python tutorial you’ll learn about timing by examining a count down timer program. Timing in programming matters because computers do things fast and with precision, and the program often needs to coordinate when certain actions happen, not just what happens. Computers run many operations at once, and timing ensures outcomes occur in the right order and at the right speed.

Reading Analog Inputs – Practical Python Tutorial Series

Welcome to the second tutorial in our Practical Python series. In the previous tutorial, you learned how to connect your Python program to the Elecrow All-in-One Starter Kit for Arduino and respond to button events generated by the Robo-Tx API. This tutorial introduces another important practical concept – reading analog inputs.

Instead of detecting whether a button is simply pressed or released, you’ll learn how to measure a simple analog signal generated by the sliding potentiometer built into the All-in-One Starter Kit. By the end of this tutorial you’ll understand how the Robo-Tx API represents analog sensors and how its built-in conversion feature allows you to work with meaningful engineering values rather than raw hardware measurements.

Before You Begin

If you haven’t already prepared your hardware and Python environment, first follow the instructions provided in the GitHub repository. The Python example used in this tutorial (1-slider.py) can be found at the same repository.

Don’t have an All-in-One Starter Kit? The Python Programming: Robotics Foundation Course provides supervised tuition together with remote access to the same All-in-One Starter kit, allowing you to learn challenging Robo-Tx API and Python programming concepts from anywhere.

Tutorial Objectives

Building on the concepts of the previous tutorial, you will learn how to:

  • read an analog sensor
  • understand raw analog values
  • convert analog readings into more meaningful units
  • use converter functions to separate conversion logic from application code

These concepts are used throughout robotics, automation and embedded systems whenever sensors measure continuously varying quantities such as light level, temperature, sound, position or voltage.

What Are Analog Inputs?

Unlike the push button from the previous tutorial, which has only two possible states (pressed or released), the slider is an analog device. As you move the slider, the Arduino measures a continuously changing voltage.

This voltage is converted by the Arduino into a digital number ranging from:

  • 0 (slider fully left)
  • 1023 (slider fully right)

Every position between these two extremes produces a different value. The sliding potentiometer on the All-in-One Starter Kit is connected internally to Arduino analog input A0.

Understanding the Program

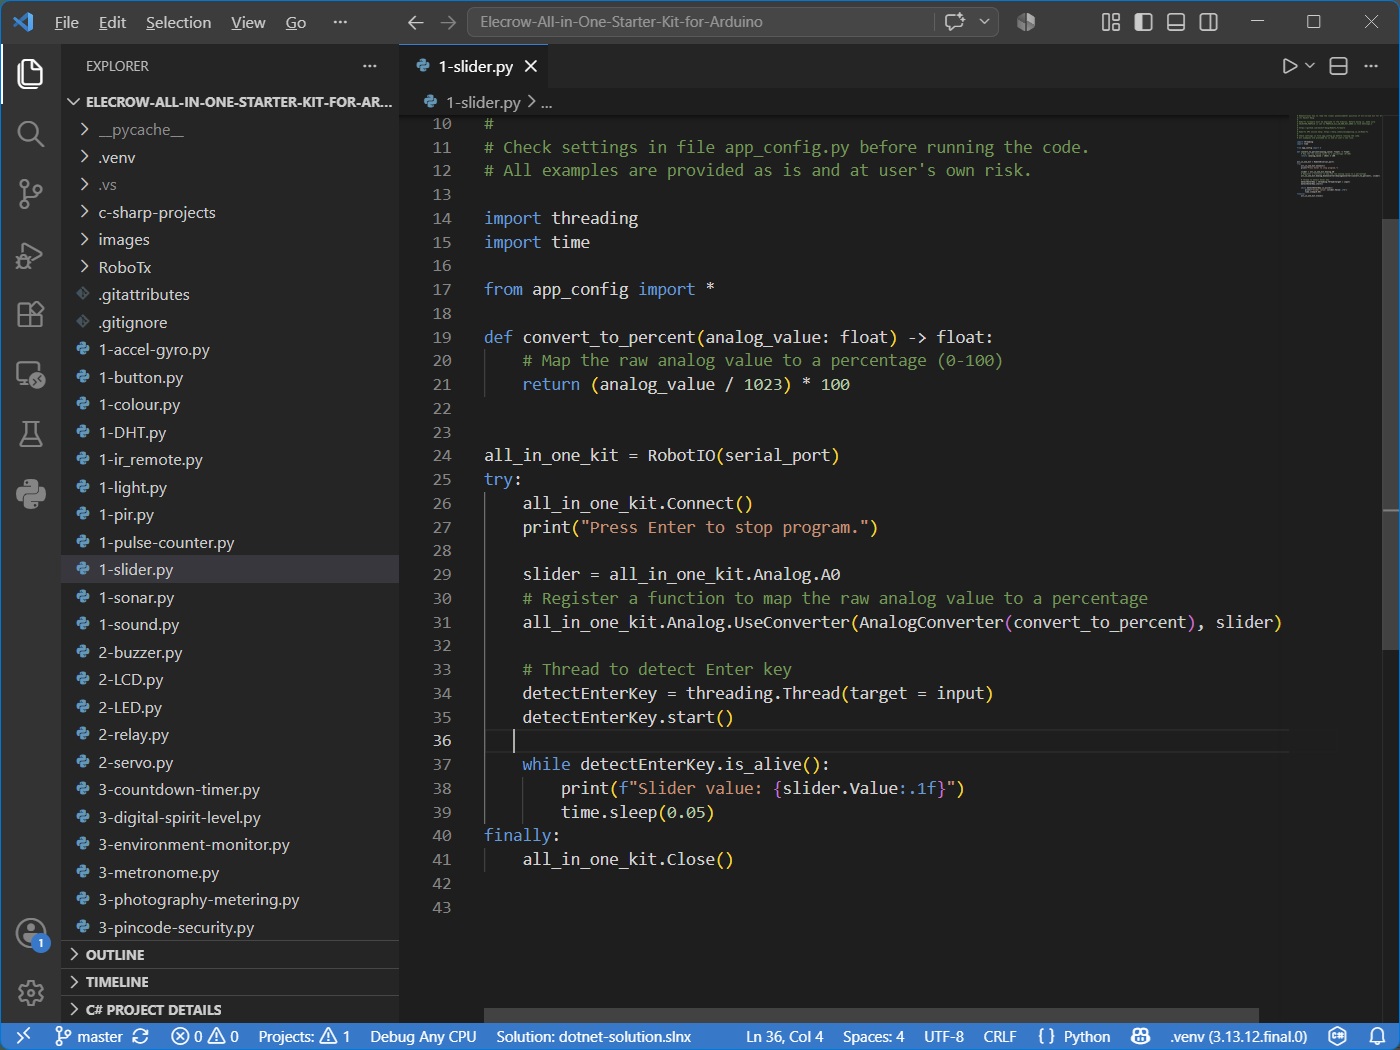
Although this program has similarities to the previous example, it introduces several new programming ideas.

Screenshot of Python code for processing input values from analog sensors using Robo-Tx API and Elecrow All-in-One Starter kit for Arduino.

Connecting to the Hardware

The connection process is identical to that of the previous tutorial.

all_in_one_kit = RobotIO(serial_port)
all_in_one_kit.Connect()

The RobotIO object establishes communication with the Robo-Tx firmware running on the Arduino. Once connected, Python can begin reading the state of sensors attached to the board.

Accessing the Slider

The slider is represented by an object provided by the Robo-Tx API.

slider = all_in_one_kit.Analog.A0

Notice that you are not reading a value here. Instead, you obtain a Python object representing analog input A0. This object exposes the Value property, which always contains the most recent reading from the slider. The object-oriented design of the Robo-Tx API keeps your code clean and intuitive.

Reading the Current Position

Once the slider object has been created, reading its current position is straightforward.

print(slider.Value)

The Value property normally returns the raw analog reading between 0 and 1023. As the slider moves, this value changes continuously. You never need to communicate directly with the Arduino yourself—the Robo-Tx API keeps the value updated automatically.

Understanding Raw Values of Analog Inputs

Many beginner students wonder why the value ranges from 0 to 1023 instead of 0 to 100. The answer lies inside the Arduino. Its analog-to-digital converter measures voltages using 10 bits of precision. Ten binary digits can represent: 2¹⁰ = 1024 values. Since counting begins at zero, the available readings range from: 0 … 1023.

Although this is ideal for electronics, it is not always the most meaningful representation for application software.

For example, many users would rather see:

  • 0–100%
  • degrees Celsius
  • centimetres
  • litres
  • motor speed
  • battery percentage

This is exactly what the Robo-Tx analog converter feature was designed to achieve.

Converting Values Automatically

The example defines a simple Python function.

def convert_to_percent(analog_value: float) -> float:
    return (analog_value / 1023) * 100

This function accepts the raw analog value and converts it into a percentage. Examples include:

Raw ValuePercentage
00%
25625%
51250%
76875%
1023100%
Converting raw analog inputs to readable and user friendly values.

This conversion can make the analog value much easier for users to understand and work with.

Registering the Converter

The Robo-Tx API allows converter functions to be registered with an analog input.

all_in_one_kit.analog.UseConverter(analogConverter(convert_to_percent), slider)

This is one of the elegant features of the API. Rather than requiring every part of your program to remember how to convert analog values, the conversion is attached directly to the analog input itself. After registration, every time your program accesses:

slider.Value

the returned value has already been converted into a percentage. The rest of your application no longer needs to know anything about the original 0–1023 range.

Why Is This Good Software Design?

Separating conversion logic from application code has several advantages. Your program becomes easier to read because every part of the code works with meaningful values instead of hardware-specific numbers. It also becomes easier to maintain. Suppose a future project requires the slider to report values between 0 and 1 instead of percentages. Only the converter function needs to change. The remainder of the program can continue using slider.Value without modification. This separation of responsibilities is a common design principle used throughout professional software engineering.

Running the Program

The main loop is very simple.

while detectEnterKey.is_alive():
    print(f"Slider value: {slider.Value:.1f}")
    time.sleep(0.05)

As you move the slider backwards and forwards, the percentage displayed on the computer console changes smoothly between 0.0 and 100.0.

Meanwhile, the background thread continues waiting for the user to press Enter, allowing the program to terminate safely. Just like the previous tutorial, the hardware connection is closed automatically using the finally block.

Programming Concepts Covered

This example introduces several important Python and software engineering concepts:

  • analog inputs
  • object references
  • object properties
  • defining reusable functions
  • conversion from raw to meaningful values
  • abstraction using object orientation
  • separation of concerns

Together with the previous tutorial, these examples begin to demonstrate how the Robo-Tx API hides much of the complexity of hardware communication, allowing you to concentrate on writing clear, readable Python code.


Challenge Exercises

Try extending the program yourself.

  1. Comment out the line of code that registers the converter function and re-run the program. Can you see the difference?
  2. Write and register a converter function that produces values between 0.0 and 1.0 from the raw analog value. The function must accept a parameter of type float, and return a value of type float.
  3. Only display the value when it changes. This will greatly reduce the amount of text printed to the console.
  4. Write and register a converter function that reverses the scale, so moving the slider to the right displays 0%, while moving it to the left displays 100%.

Looking Ahead

The slider is just one example of an analog sensor. The same programming techniques can be applied to many other analog input devices, including light sensors, temperature sensors, and microphones. The Elecrow All-in-One Start Kit for Arduino has an audio sensor connected to Arduino analog pin A1, and a connection socket attached to analog pin A6. Both of these pins are accessible via the Robo-Tx API in the same way as the slider.

In the next practical Python tutorial we’ll build a program to measure distance using the sonar module of the Elecrow All-in-One Starter Kit, and generate an audible alert that corresponds to the measured distance.

By gradually combining inputs, outputs and decision making in the following tutorials, you’ll build the practical Python skills needed for increasingly sophisticated robotics and automation projects using the Robo-Tx API.